Introduction
In this article, we are going to cover what is Kubernetes scheduling and how it works and its related components such as taints and tolerations, node affinity, daemon sets etc.
In Kubernetes, scheduling refers to ensuring Pods are matched to Nodes so that Kubelet can run them.
So whenever there is a new pod created scheduler identifies it to make sure that the pod is assigned to the perfect node.
Sheduler can automatically take decisions whenever a particular node has no resources let scheduler will not let a new pod go into that pod and schedule in another.
Node selection in kube-scheduler
kube-scheduler selects a node for the pod in a 2-step operation:
- Filtering
- Scoring
1: The filtering step finds the set of Nodes where it’s feasible to schedule the Pod. For example, the PodFitsResources filter checks whether a candidate Node has enough available resources to meet a Pod’s specific resource requests. After this step, the node list contains any suitable Nodes; often, there will be more than one. If the list is empty, that Pod isn’t (yet) schedulable.
2: In the scoring step, the scheduler ranks the remaining nodes to choose the most suitable Pod placement. The scheduler assigns a score to each Node that survived filtering, basing this score on the active scoring rules.
There might be some cases where we need to run production applications on a particular node and development on a particular one based on the hardware, resources etc.
Also, we may need to run a pod every time a new node spins up the cluster example kube-proxy In that case we need to use other components of the Kubernetes scheduler.
Will cover all these in this article.
Nodename/Manual scheduling
Nodename is the direct method to schedule pods on respected nodes.
nodeName is a field in the Pod spec. If the nodeName field is not empty, the scheduler ignores the Pod and the kubelet on the named node tries to place the Pod on that node. Using nodeName overrules using nodeSelector or affinity and anti-affinity rules.
Some of the limitations of using nodeName to select nodes are:
If the named node does not exist, the Pod will not run, and in some cases may be automatically deleted.
If the named node does not have the resources to accommodate the Pod, the Pod will fail and its reason will indicate why, for example, OutOfmemory or OutOfcpu.
Node names in cloud environments are not always predictable or stable.
apiVersion: v1
kind: Pod
metadata:
  name: nginx
spec:
  containers:
  - name: nginx
    image: nginx
  nodeName: node01
Here we directly specify the nodeName property in the pod manifest file.
So our pods get directly scheduled to the mentioned node.
We will always rely on our Kubernetes scheduler to do these operations. But still using the scheduler how you can restrict what pods are placed on what nodes?
For that, we use a Kubernetes object called taints and tolerations
Taints and Tolerations
Taints and Tolerations are used to set restrictions on what pods can be scheduled on a node.
Taints are set on nodes and tolerations are set on pods.
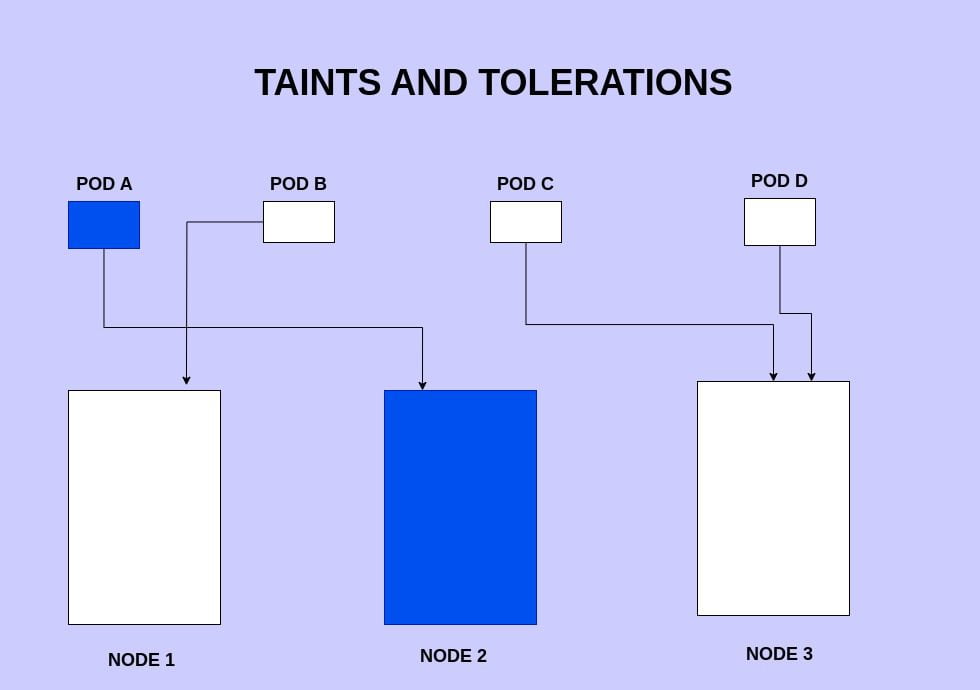
Please observe the above image where we have 3 nodes and 4 pods. Assume our NODE2 has a taint configured with only allow pods that match the color=blue toleration.
So as you can see in the above image the the NODE2 only accept the podA and blocks other pods from being scheduled into the node.
The node2 makes sure that the pods that do not match the taints are not scheduled in the node.
So if you want to taint a node you can use the below command
kubectl taint nodes <node-name> key=value:taint-effectTaints have different effects that define how pods are affected when trying to schedule onto nodes with those taints. There are three possible taint effects:
- NoSchedule: This effect means that pods that do not have matching tolerations will not be scheduled onto nodes with the corresponding taint. The pods will be placed on other nodes without the taint, ensuring that the node remains free of the pods that don’t meet the taint’s requirements.
- PreferNoSchedule: Similar to the “NoSchedule” effect, pods without matching tolerations won’t be scheduled onto nodes with this taint. However, Kubernetes will try to avoid placing the pods on these tainted nodes, but if there are no other options, the pods can still be scheduled there.
- NoExecute: This effect is more strict than the previous two. Not only will pods without matching tolerations not be scheduled onto nodes with this taint, but if a node already has pods running on it and a taint with the “NoExecute” effect is applied, any pods on that node without matching tolerations will be evicted (removed) from the node.
So in the above example if want to taint my node2 this will be the command that i need to enter
kubectl taint nodes node2 color=blue:NoScheduleAlso in the pod manifest file of pod A, I need to add the tolerations section.
apiVersion: v1
kind: Pod
metadata:
 name: POD B
spec:
 containers:
 - name: nginx-container
   image: nginx
 tolerations:
 - key: "color"
   operator: "Equal"
   value: "blue"
   effect: "NoSchedule"
Taints and Tolerations do not tell the pod to go to a particular node. Instead, they tell the node to only accept pods with certain tolerations.
Refer to the official documentation for a better understanding
https://kubernetes.io/docs/concepts/scheduling-eviction/taint-and-toleration/
Node selectors
nodeSelector is the simplest recommended form of node selection constraint. You can add the nodeSelector field to your Pod specification and specify the node labels you want the target node to have. Kubernetes only schedules the Pod onto nodes that have each of the labels you specify.
You can use this command to label your node
kubectl label nodes <your_node_name> disktype=ssd

apiVersion: v1
kind: Pod
metadata:
  name: nginx
  labels:
    env: test
spec:
  containers:
  - name: nginx
    image: nginx
    imagePullPolicy: IfNotPresent
  nodeSelector:
    disktype: ssd
in the above pod defintion.yaml file we are adding an additional option under the spec section called nodeSelector which matches the value of node1.
You can create a new pod using this manifest file and check under which node it got deployed. this pod will be scheduled on node1 matching the node label as you can see in the below screenshot.

With Nodeselectors we cannot provide advanced features say I have 3 nodes large medium and small and I want to deploy my pod in the large as first preference and if it is not available then in the medium but never in the small node.
These things cannot be achieved using nodeSelectors so we use nodeAffinity for it.
NodeAffinity
So taints don’t tell pods to go to a particular node then what components does that operation if I have that particular requirement? For that, we have a component called node affinity.
The primary feature of Node Affinity is to ensure that the pods are hosted on particular nodes.
There are two types of node affinity:
requiredDuringSchedulingIgnoredDuringExecution: The scheduler can’t schedule the Pod unless the rule is met. This functions like nodeSelector but with a more expressive syntax.
preferredDuringSchedulingIgnoredDuringExecution: The scheduler tries to find a node that meets the rule. If a matching node is not available, the scheduler still schedules the Pod.
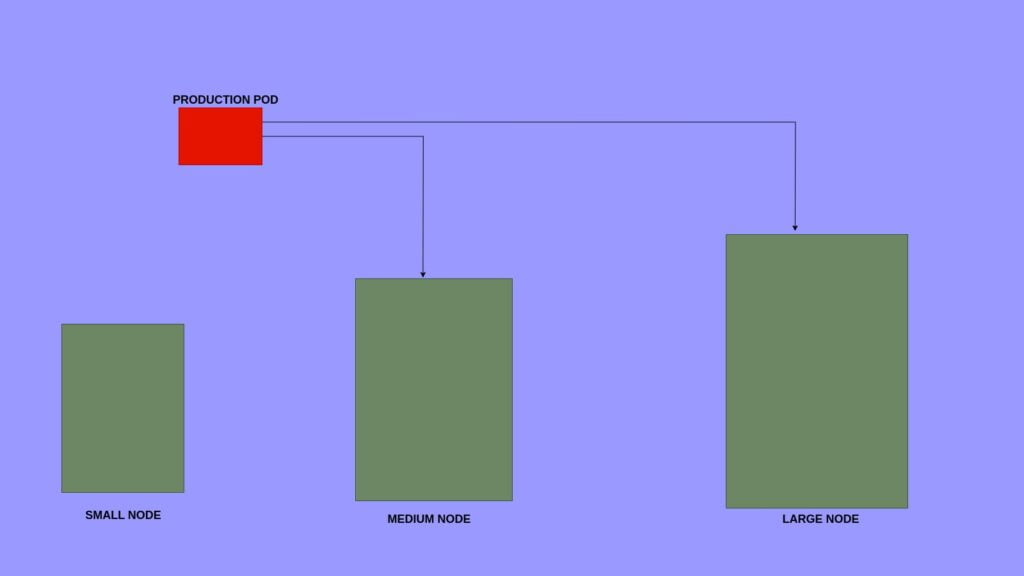
Assume we have 3 nodes with large, medium, and small based on the resource configurations
As shown in the above image.
I am deploying a production POD application so I want this pod to get deployed on the Large node as the first preference and into the Medium node as the next preference but never into the SMALL node.
This is achieved using this pod manifest file and NodeAffinity
apiVersion: v1
kind: Pod
metadata:
 name: mynginx-pod
spec:
 containers:
 - name: nginx-container
   image: nginx
 affinity:
   nodeAffinity:
     requiredDuringSchedulingIgnoredDuringExecution:
        nodeSelectorTerms:
        - matchExpressions:
          - key: size
            operator: In
            values:
            - Large
            - Medium
Also, we can use the NotIN operator to not schedule the pods in Small nodes
apiVersion: v1
kind: Pod
metadata:
 name: mynginx-pod
spec:
 containers:
 - name: nginx-container
   image: nginx
 affinity:
   nodeAffinity:
     requiredDuringSchedulingIgnoredDuringExecution:
        nodeSelectorTerms:
        - matchExpressions:
          - key: size
            operator: NotIn
            values:
            - Small
You can refer to the official documentation for more details regarding nodeAffinity
assign-pods-nodes-using-node-affinity
Deamon sets
In some cases we want a pod to be scheduled on every node of the cluster for example a monitoring application, or kube proxy these applications must have at least one copy of pod running on each node of your cluster
DaemonSets are like replicasets, as it help to deploy multiple instances of pod. But it runs one copy of your pod on each node in your cluster.
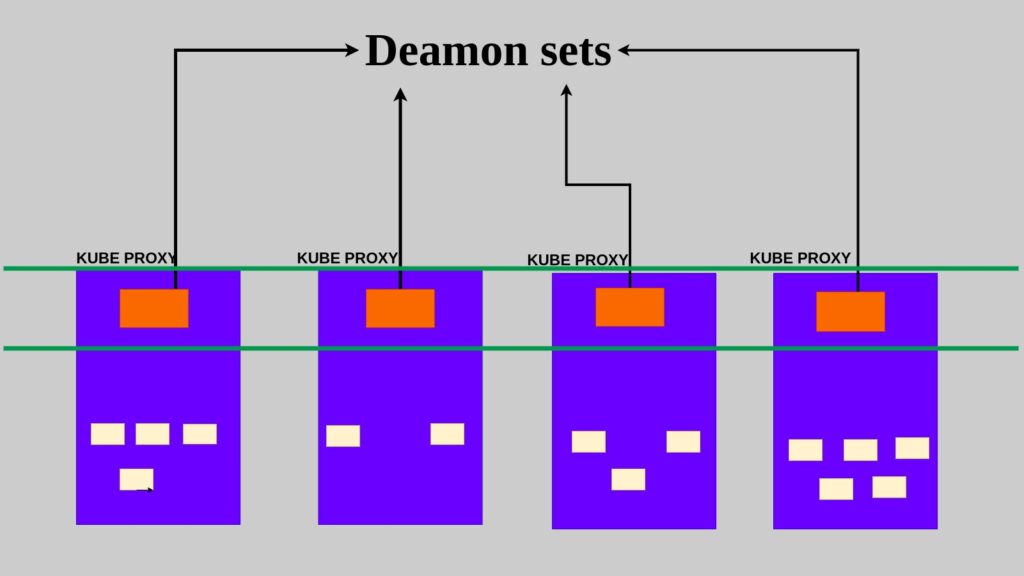
As shown in the above image the Kube proxy pod is deployed on every node which is deployed via daemon set. Kube-proxy is a component of Kubernetes responsible for network proxying within the cluster. It maintains network rules on each node to enable network communication to and from the pods running on that node.
Lets see how a deamon set is created
apiVersion: apps/v1
kind: DaemonSet
metadata:
  name: nginx-daemon
  labels:
    app: nginx
spec:
  selector:
    matchLabels:
      app: nginx-daemonset
  template:
    metadata:
     labels:
       app: nginx-daemonset
    spec:
      containers:
      - name: nginx-daemonset
        image: nginx
The template looks simlar to Replicaset the only difference is that the kind section using this template i am deploying the Daemonset.
Apply this template using kubectl create -f template.yml.

As shown in the above image we can see the desired count is 2.This is the because we have 2 nodes one controlplane and one node 01.
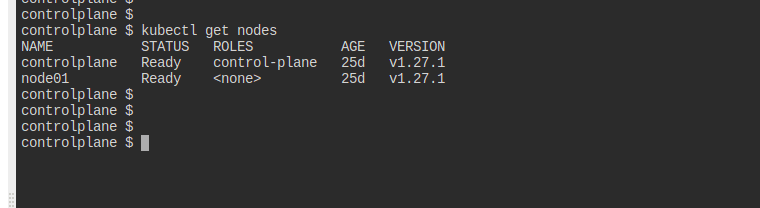
After successfuly deployed the template you will be able to 2 pods running one in controlplane and one in node01 as expected

Thats all about daemon sets you can refer to offical kuberents documentation for more details
daemonset
Summary:
Thats all about kuberentes scheduler and various compontents of kuberentes scheduler you can always refer to the offical documentaion for more details