
Before diving into networking in Kubernetes you need to have a basic understanding of Linux networking.
You must have a basic understanding of IP routing, DNS, IP adding, gateways, etc.
Networking in Kubernetes is considered the hardest part to learn as there are so many aspects.
In this blog, I aim to simplify Kubernetes networking concepts at a beginner’s level.
What is a network?
Assume We have 2 systems A and system B For communicating with each other we need to connect the 2 systems to a switch and the switch creates a network containing the 2 systems.
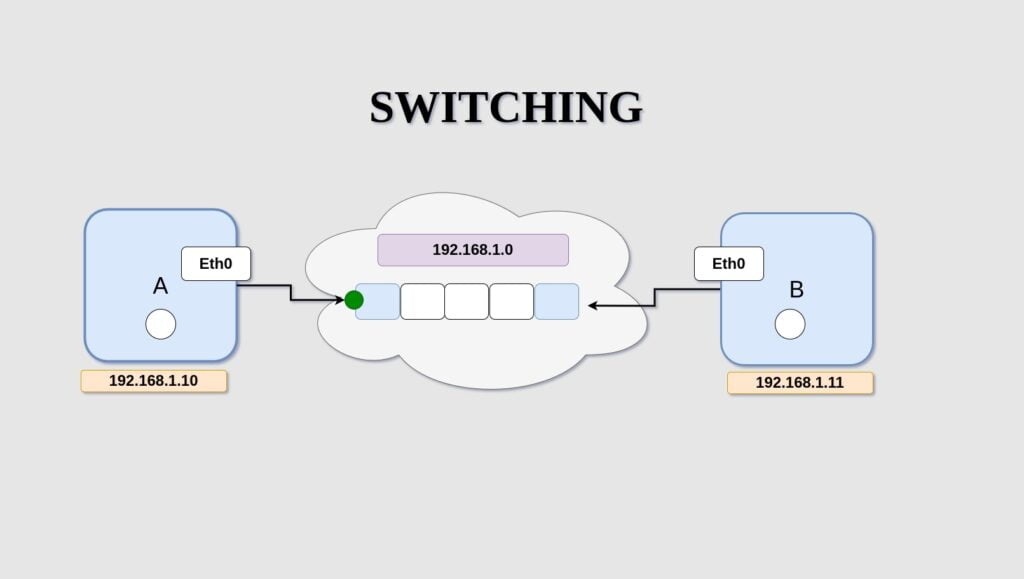
As shown in the above image systems A and B are interconnected via Switch.
The switch is in a network 192.168.1.0.
etho is the interface of the system in which the switch is connected, and using the ipaddr command we can assign an IP address to the systems.
Switches can only make communications within a network.
If system A needs to communicate with another system outside the network we need routers for it. Routers are nothing but another server/system on the network with many network ports configured. Gateway is a door to the outside world it is a connection point between 2 networks
We all have our routing table and gateway configured for viewing just type the route command.

This routing table entry defines the default route, indicating that any traffic for which there is no more specific route should be sent to the specified gateway (represented by “_gateway“) through the “wlp0s20f3” wireless interface to the internet.
Also, the last line indicates that to communicate within the system within the same network 192.168.1.0/24 it doesn’t need a gateway.
Network namespaces in Linux

There is network isolation used by container services like docker to deploy their application.
Namespaces in Linux are nothing but isolated programs running from the host.
When we run a docker container on its isolated namespace it cannot see the process running on the host system.
Inside the container, there will only be 1 process with PID one. Each container will have an isolated network from the host.
As shown in the above image docker lies on the subnet 172.17.0.0/16 and the host machine is on the subnet 192.168.0.0/16 subnet.
The 2 containers created containers A and B having IP addresses assigned from docker’s subnet range. These 2 are isolated machines that are unaware of the host and its network.
Networking in Kubernetes
The Kubernetes networking implementation allocates IP addresses, assigns DNS names, and maps ports to your Pods and Services. This process is generally automatic—when using Kubernetes, you won’t normally have to manage these tasks on your network infrastructure or Node hosts.
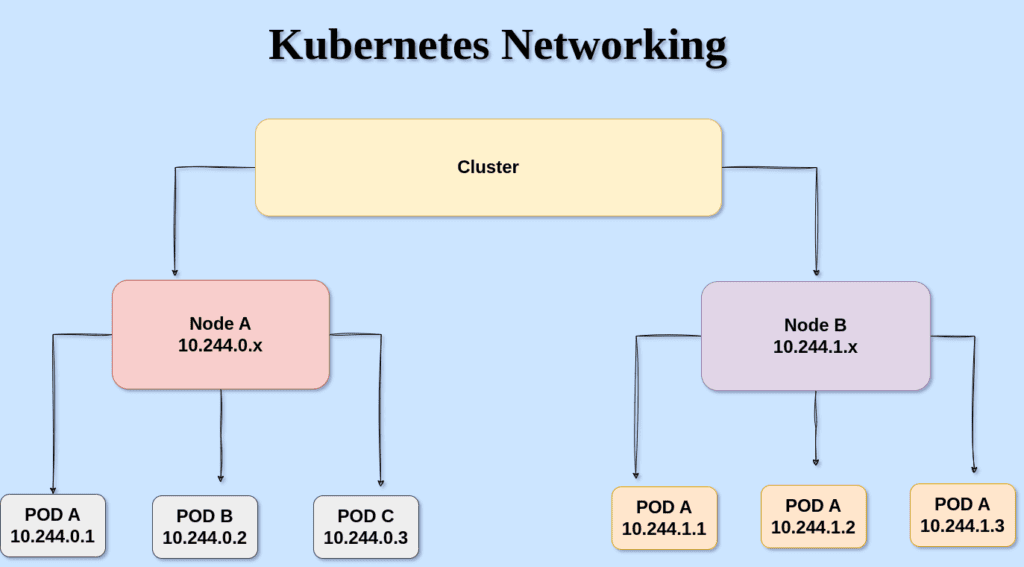
The above shown is a sample Kubernetes cluster networking having 2 nodes configured each node has its subnet range and each pod deployed under the nodes has its IP address.
Kubernetes, utilizing kube-proxy for service routing and allowing external access through various mechanisms like NodePort, external load balancers, and Ingress controllers.
Docker networking focuses on container-to-container communication within or across hosts, whereas Kubernetes networking provides a more comprehensive solution for managing communication, service discovery, and policies in a container orchestration environment at the cluster level.
DNS and COREDNS
DNS is nothing but the conversation of a domain name to an IP address if you have no idea about DNS and how it works please visit our previous article DNS Records & Mapping.
CoreDNS is the internal DNS server in Kubernetes.CoreDNS plays a crucial role in facilitating communication between different pods within the cluster.
When you create a service in Kubernetes, a DNS record is automatically created for that service. This DNS record points to the cluster IP of the service. This allows other pods within the cluster to communicate with the service using its DNS name rather than having to know its specific IP address.
When one pod needs to communicate with another pod within the cluster, it can use the DNS name of the target pod. Each pod in a Kubernetes cluster is assigned a DNS name based on its pod name and namespace.
CoreDNS uses a cluster-specific domain (e.g., cluster.local) to distinguish the internal cluster DNS names from external DNS names.
Assume you have two pods named pod-a and pod-b in the default namespace.
CoreDNS automatically creates DNS records for these pods: pod-a.default.svc.cluster.local and pod-b.default.svc.cluster.local.
If pod-a wants to communicate with pod-b, it can simply use the DNS name pod-b.default.svc.cluster.local instead of dealing with IP addresses directly.
Container networking interfaces
It is a networking standard developed for attaching networking to containers in a Kubernetes environment.
Many container runtimes are supported by Kubernetes such as docker, rocket, etc.
So the networking configurations might be different in each of these to address this issue Kubernetes developed a standard networking plugin that dynamically attaches the network to containers no matter which runtime they are using.
There are various plugins developed by CNI such as bridge, VLAN, IPVLAN, etc also there are 3rd party plugins such as flannel, weave, cilium, etc using these plugins our container runtimes attach the network to containers.
Networking in pods
In a Kubernetes cluster, there’s a network overlay that spans across all the nodes. This overlay network allows pods to communicate with each other, regardless of the physical or virtual machines they are running on. Each pod gets its IP address with this overlay network each pods communicate with each other with its IP address. When a pod is created on a node, the CNI plugin assigns an IP address to it from the predefined range associated with that node. Each node has its subnet within the overlay network.
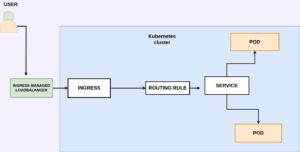
Ingress in Kubernetes
Imagine you are deploying a pod in a locally managed Kubernetes cluster so after you have successfully deployed the pod you create a service of type node port to expose the application externally.
If you have no idea regarding Kubernetes services review our article Kubernetes_services.
After that, your application will be accessible on ip of the node and node port (30000 – 32767). Also, assume that you have configured DNS for the application so users can access your application using the DNS name and node port.
But NODEPORT can only assign high-level port which is greater than 30000 so we need to bring an additional proxy server that forwards requests from port 80 to this node port.
For cloud-managed clusters, the load balancer service type offers an external IP address for application exposure. Yet, as your application expands, requiring path-based routing (e.g., /videos to the video application, /images to the images application), managing individual load balancers for each application becomes hectic. Additionally, SSL certificates need to be managed individually.d
To resolve all these complexities in a centralized manner, an Ingress Controller comes into play. It allows you to create and manage routing rules, SSL certificates, and load balancing for multiple applications, providing a unified solution for efficient application exposure and management
There are various types of ingress solutions like Nginx, HA -proxy, traefix these are called ingress controllers.
Kubernetes cluster doesn’t come with an ingress controller by default.
Summary:
In this article, we have covered the basic networking concepts in Kubernetes.
In the next article, we are going to deploy a nginx ingress controller nginx-ingress-controller.
[…] Please visit my previous article regarding Kubernetes networking to gain some networking basics.networking-in-Kubernetes-simplified […]