Introduction: Kubernetes, often regarded as the powerhouse of container orchestration, thrives on its vast ecosystem of objects and components. However, in this complex Kubernetes universe, one crucial aspect often overlooked is the robust authorization and access control system. This system is the key to knowing who wields control over your Kubernetes cluster.
When deploying Kubernetes clusters on cloud platforms, it’s common to have a single configuration that grants almost unrestricted access to the cluster. This means that anyone can execute operations within the cluster without proper controls in place. Fortunately, Kubernetes offers a sophisticated access control system that provides a solution to this issue. In this article, we’ll delve into the intricacies of Kubernetes authorization and access control.
First of all, creating a user in cloud-managed clusters is a bit different compared to self-managed clusters.
Understanding the Kubeconfig File:
The kubeconfig file is utilized by the kubectl command-line tool to gather essential information for cluster selection and API server communication. By default, kubectl searches for a file named “config” in the $HOME/.kube directory. However, it’s worth noting that you can specify alternative kubeconfig files either through the KUBECONFIG environment variable or by using the –kubeconfig flag.
Here are the three key elements of a kubeconfig file that you need to be aware of:
- Cluster Information: The kubeconfig file contains details about the Kubernetes cluster, such as the cluster’s name, server address, and certificate authority data. This information is vital for establishing a connection with the cluster.
- User Configuration: User-specific configurations are defined in the kubeconfig file, including user credentials, authentication methods, and associated tokens or certificates. These configurations determine who can access the cluster.
- Context Configuration: Contexts define the combination of a cluster and a user. They specify which cluster a user can access and the credentials they should use. Contexts are essential for managing user access to different clusters seamlessly.
Before we dive into the Kubernetes access control system, it’s essential to grasp the significance of the kubeconfig file. While many are familiar with its role in connecting to Kubernetes clusters, there’s more to this film than meets the eye. It plays a pivotal role in granting access to users.
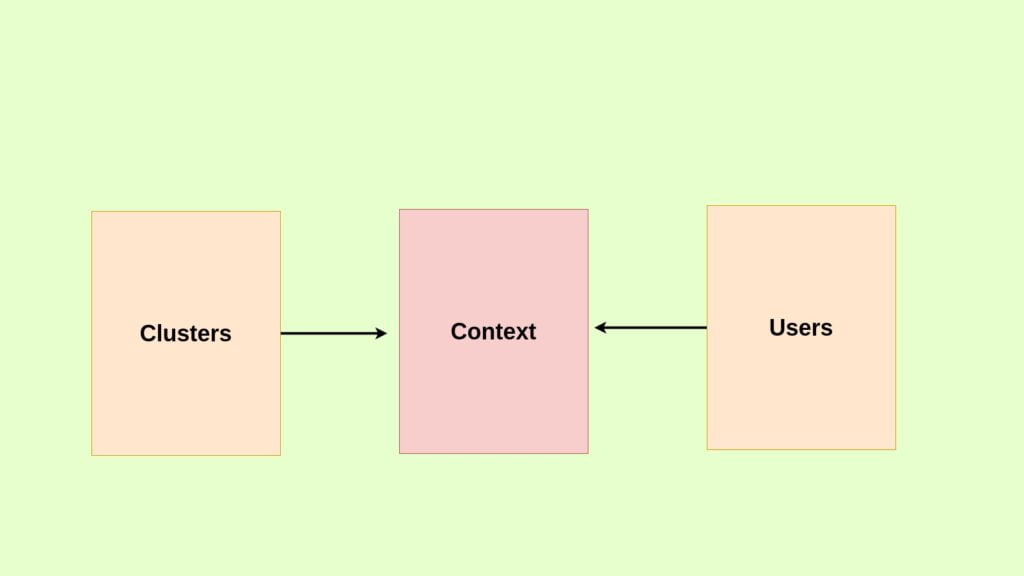
Say you have user name dev-user which has access to the development cluster the context creates a connection between the dev-user and the cluster like [email protected] earlier
Here will draft the steps to create a user in a self-managed cluster
- Create a Private Key for the User
- In this step, you will generate a private key for the new user that you want to create.
- Generate a Certificate Signing Request (CSR) for the User
- This step involves creating a Certificate Signing Request (CSR) for the user using their private key.
- Review and Approve the User’s CSR
- In this final step, you will review and approve the Certificate Signing Request (CSR) submitted by the user.
- Retrive the certificate of the user
- You need to the decode the certificate of the user from the CSR
- Create a Kubeconfig File for the User
- After obtaining the user certificate, you will create a kubeconfig file for the user to access the cluster.
- Grant Role and Role bindings Permissions to the User
- With the kubeconfig file in place, you will configure Role-Based Access Control (RBAC) to grant the user the necessary permissions to interact with the cluster.
If you are creating a user for a cloud-managed cluster your cloud provider will have the CA no need to create the self-signed CA for your cluster.
Here I am using Minikube cluster Minikube has its own self signed CA created on the provision of the cluster initially.
Create a Private Key for the User
mkdir ~/certs
This command creates a new directory named “certs” in your home directory (). The tilde () represents your home directory, so this command creates a “certs” directory directly inside your home directory.
openssl genrsa -out ~/certs/minikube-user.key 4096
This command generates a new RSA private key using OpenSSL with a key length of 4096 bits.

You will a similar output as shown below if you complete the above step.
Generate a Certificate Signing Request (CSR) for the User
vi ~/certs/minikube-user.csr.cnf
[ req ]
default_bits = 2048
prompt = no
default_md = sha256
distinguished_name = dn
[ dn ]
CN = minikube-user
O = developers
[ v3_ext ]
authorityKeyIdentifier=keyid,issuer:always
basicConstraints=CA:FALSE
keyUsage=keyEncipherment,dataEncipherment
extendedKeyUsage=serverAuth,clientAuth
create a text file that contains configuration settings for generating the CSR. It specifies various details, including the Common Name (CN) and other attributes that will be included in the certificate.
openssl req -config ~/certs/minikube-user.csr.cnf -new -key ~/certs/minikube-user.key -nodes -out ~/certs/minikube-user.csr
This command generates the CSR using the OpenSSL req command.
-config ~/certs/minikube-user.csr.cnf: Specifies the configuration file to use for generating the CSR.
-new: Indicates that a new CSR is being created.
-key ~/certs/minikube-user.key: Specifies the private key file to associate with the CSR.
-nodes: This option generates the CSR without encrypting the private key with a passphrase, resulting in an unencrypted key.
-out ~/certs/minikube-user.csr: Specifies the output file for the generated CSR, which will be saved in the “~/certs” directory with the filename “minikube-user.csr.”
Create a Kubernetes object.
cat <<EOF | kubectl apply -f -
apiVersion: certificates.k8s.io/v1
kind: CertificateSigningRequest
metadata:
  name: minikube-authentication
spec:
  groups:
  - system:authenticated
  request: $(cat ~/certs/minikube-user.csr | base64 | tr -d '\n')
  usages:
  - digital signature
  - key encipherment
  - client auth
  signerName: kubernetes.io/kube-apiserver-client
EOF
This YAML creates a CertificateSigningRequest (CSR) named “minikube-user-authentication” for an authenticated user. The CSR includes a base64-encoded user certificate signing request and specifies its intended usage.
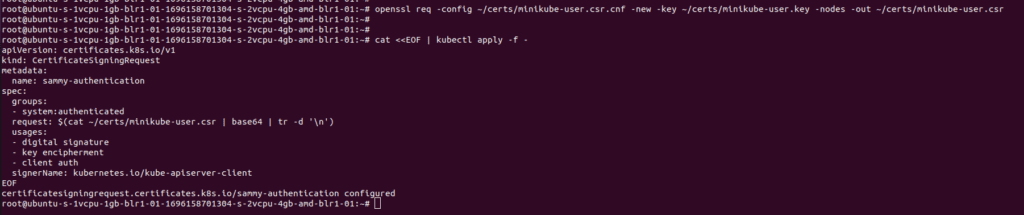
If you have completed the above step you will get a similar response like this as shown above
You can check the details of the CSR using the command.
kubectl get csr
Review and Approve the User’s CSR
Review and approve the CSR of the user using the below command.
kubectl certificate approve minikube-authentication
certificatesigningrequest.certificates.k8s.io/minikube-authentication approved

If approved you will get a similar response as above after that check the status of the CSR again it will be in an approved, issued state.
Retrieve the certificate of the user
kubectl get csr minikube-authentication -o jsonpath='{.status.certificate}’ | base64 –decode > ~/certs/minikube-user.crt
The certificate will be in a base64 encoded format order to decode it use the above command this will save the certificate of the user in minikube-user.crt file
After the certificate is created copy the certificate and key to your local system inorder to connect

Create a Kubeconfig File for the User
By default, the the ca.crt of minikube is stored in /root/.minikube/ca.crt so you can just either copy the exact file to your system or decode the ca.crt with base64 and add it directly in the template
I have copied ca. crt ,minikube-user. crt and minikube-user.key to my local system.
And created the kubeconfig file for the user minikube-user.
apiVersion: v1
clusters:
- cluster:
    certificate-authority: /myfolder/ca.crt
    extensions:
    - extension:
        last-update: Sun, 01 Oct 2023 12:23:21 UTC
        provider: minikube.sigs.k8s.io
        version: v1.31.2
      name: cluster_info
    server: https://<ipaddress>:8443
  name: minikube
contexts:
- context:
    cluster: minikube
    user: minikube-user
  name: minikube-user
current-context: minikube-user
kind: Config
preferences: {}
users:
- name: minikube
  user:
   client-certificate: /myfolder/minikube-user.crt
   client-key: /myfolder/minikube-user.key


~
Replace the IP address with minikube apiserver IP address
If you need to access the minikube cluster from a different network you need to expose the minikube API server
Once you have created this yaml file you can run the below command to check the working.
kubectl –kubeconfig=kubecnf.yaml cluster-info

You will get a forbidden error as shown in the above screenshot which means the user has no access to the cluster
Create a Role and Rolebinding to the User
Next, we need to create a role and a role binding for that user to access the cluster.
To create a Role and RoleBinding in Kubernetes using YAML templates for a user named minikube-user to perform all actions in the default namespace, you can follow these steps:
Create a Role YAML file (e.g., minikube-user-role.yaml) with the following content
apiVersion: rbac.authorization.k8s.io/v1
kind: Role
metadata:
  namespace: default
  name: minikube-user-role
rules:
- apiGroups: [""]
  resources: ["pods", "services", "configmaps", "secrets", "deployments", "replicasets"]
  verbs: ["get", "list", "watch", "create", "update", "delete"]

This Role allows the user to perform all actions (get, list, watch, create, update, delete) on resources like Pods, Services, ConfigMaps, Secrets, Deployments, and ReplicaSets within the default namespace.
This RoleBinding associates the minikube-user with the minikube-user-role within the default namespace.
apiVersion: rbac.authorization.k8s.io/v1
kind: RoleBinding
metadata:
  name: minikube-edit-role
  namespace: default
subjects:
- kind: User
  name: minikube-user
  apiGroup: rbac.authorization.k8s.io
roleRef:
  kind: Role
  name: minikube-user-role
  apiGroup: rbac.authorization.k8s.io
After creating the role and rolebinding now if you run the same command again from your local system you will get the response as yes.
kubectl –kubeconfig=kubecnf.yaml auth can-i get pods

Now you can use this config file to access the cluster from outside.
Summary:
That’s it you have created a new user called Minikube-user and granted permissions.