This blog covers the installation and configuration of Ansible in centos 7 before going directly to the installation process learn some of the basics of Ansible.

What is Ansible?
Ansible is an open-source software tool that is used for automating tasks such as configuration management, application deployment, and infrastructure provisioning. It allows users to define tasks using a simple YAML syntax, and it can be used to manage and configure systems in a scalable and repeatable manner.
Ansible works by connecting to a set of managed nodes (such as servers, switches, or containers) and executing tasks on those nodes. It uses a push-based model, where tasks are pushed from a control machine to the managed nodes, rather than pulling tasks from the managed nodes.
In this blog, we will make one server the control node and 2 servers are managed nodes and establish connections between them.
Want to learn more about the basics of ansible visit our blog The Ultimate Guide For Learning Ansible From Scratch
Server 1: Ansible control node (Server where ansible is installed).
Server 2: Managed node 1.
Server 3: Managed node 2.
Step 1: Install ansible on the control node
- First, update the system’s package index by running the following command:
sudo yum update
- Install the Extra Packages for Enterprise Linux (EPEL) repository by running the following command:
yum install epel-release
- Install Ansible by running the following command:
yum install ansible
- To confirm that Ansible has been installed, run the following command:
ansible --versionThis should print the version number of Ansible that has been installed on your system.
Step 2: On the control node, create a user and ssh-keygen.
Now that Ansible is installed on your system, you’ll need to configure a way for it to connect to the nodes in your network. To do this, you will have to set up password-less authentication between the nodes and the Control Node.
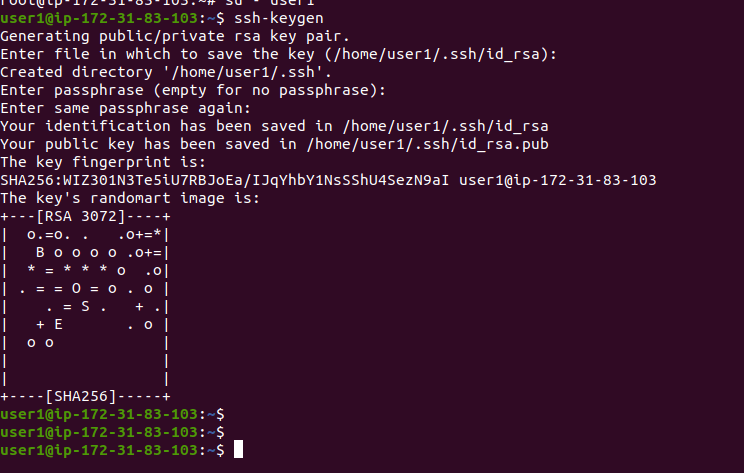
Making an ssh-keygen in the control node is the next step. On the control node, we are making a user named user1 and a directory
/bin/bash user1 useradd -m -d /home/user1
Give the account administrative access right away. The superuser capabilities assigned by the next command enable the account to utilise the Sudo command.
usermod -aG sudo user1
Using the su – user1 command, now change to that user and create an ssh-keygen using the below command.
ssh-keygen
You can provide a passphrase, but I’m not doing so for this demonstration.
Step 3: Setting up ssh connection to managed nodes
In order to configure our Ansible host, we must first establish a connection from our control node to the host. The simplest technique of creating an SSH public
Using the ssh-copy-id command is the key to copying it: Enter the managed node1’s username and IP address are listed.
ssh-copy-id root@<managednode1ipaddress>
Now that our control node and one managed node are linked, you can test their functionality by attempting to ssh into the host from the control node; no password will be required.
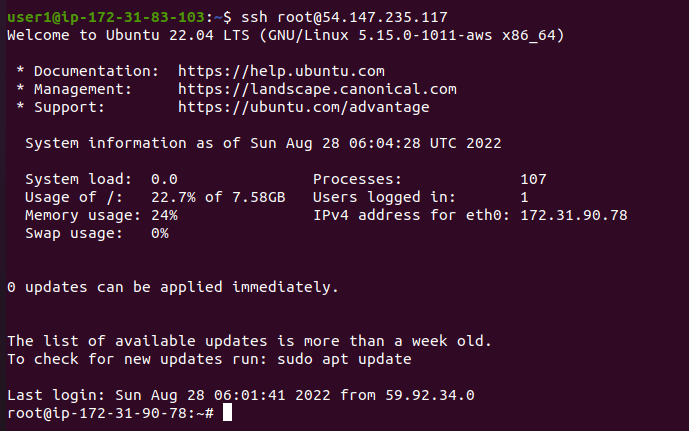
As you can see in the screenshot up top, I entered the host’s login information without typing a password. The identical procedure should be followed for a second host (managed node2).
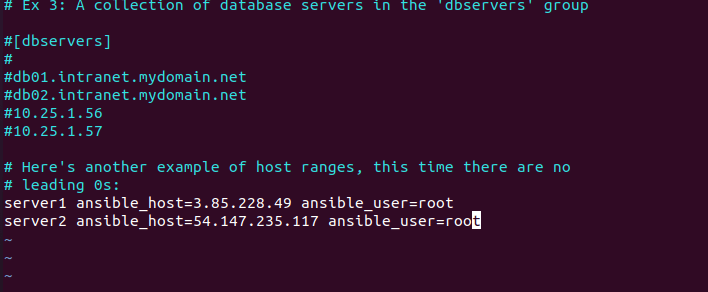
Now that we have established ssh connections with both ansibles managed nodes from our control node next step is to add the host to your inventory file
Step 4: Configure Inventory and Set Host Variables
To allow Ansible to communicate with distant hosts, we must now set up an inventory file of those hosts.
Open the ansible inventory file in your control node
sudo vi /etc/ansible/hosts
You can now begin adding remote hosts that your control node will administer once the inventory file has been opened. The default Ansible inventory file starts by listing general advice and examples on building a list of remote hosts.
use the below format to create a new host
server1 ansible_host=<ipaddress> ansible_user=<username>
Step 6:Testing the connection from the control node.
ansible all -m ping
You can use this command to test the connection from your control node to the remote host.
If the connection is successful you will get a similar response as shown below.
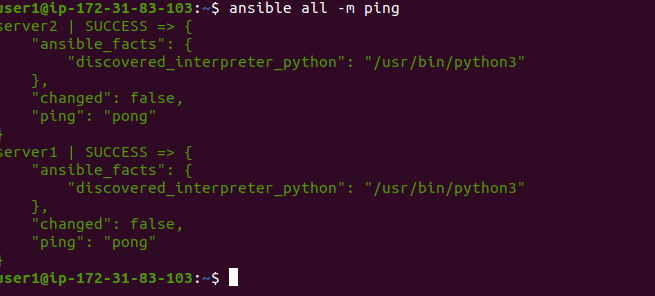
We can now use the Ansible command and playbooks to make changes to our managed node from our control node.
That’s it! Ansible should now be installed and configured on your CentOS 7 system.
Related blogs: How to install and Configure Ansible on ubuntu 20.04