In this tutorial, I am going to install Minikube and its necessary dependencies on a Ubuntu server using the none driver.
What is Minikube?
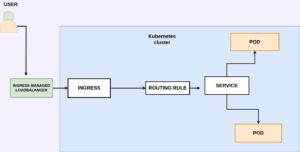
Minikube is a tool that enables developers to run a single-node Kubernetes cluster locally on their machine. It simplifies Kubernetes development and testing by providing an easy-to-use environment that closely mimics a production Kubernetes cluster. With Minikube, developers can quickly prototype, deploy, and debug applications, making it an essential tool for building and testing Kubernetes-based solutions. Its benefits include fast setup, isolation, reproducibility, and the ability to develop and test Kubernetes applications without the need for a full-scale cluster.
Most users of this driver should consider the newer Docker driver, as it is significantly easier to configure and does not require root access. The ’none’ driver is recommended for advanced users only.
Table of contents
Install prerequisites for Minikube.
Minikube System Requirements
- 2 GB RAM or more
- 2 CPU / vCPU or more
- 20 GB free hard disk space or more
- Container or virtual machine manager, such as Docker, QEMU, Hyperkit, Hyper-V, KVM, Parallels, Podman, VirtualBox, or VMware Fusion/Workstation
Here I am using the none driver. The none driver allows advanced Minikube users to skip VM creation, allowing Minikube to be run on a user-supplied VM.
A Linux VM with the following requirements:
- systemd or OpenRC
- A Container Runtime Interface (CRI), such as Docker or CRI-O
- Other dependencies such as CRI-CTL,conntrack,golang etc.
- cri-dockerd (Only if using Docker CRI)
- containernetworking-plugins
Install Minikube and its components.
Systemd comes with default Linux installation so we are going to the next requirement.
Step 1: Install container Runtime interface (Docker)
If you still haven’t installed docker on your machine please visit our previous article to install docker on Ubuntu How to install it in ubuntu 20.04.
Step 2. Install Kubectl
Download the latest release with the command
curl -LO “https://dl.k8s.io/release/$(curl -L -s https://dl.k8s.io/release/stable.txt)/bin/linux/amd64/kubectl”
Download the Kubectl checksum file
curl -LO “https://dl.k8s.io/$(curl -L -s https://dl.k8s.io/release/stable.txt)/bin/linux/amd64/kubectl.sha256″
Install kubectl
sudo install -o root -g root -m 0755 kubectl /usr/local/bin/kubectl
and check the version using the command kubectl version –client
Step 3. Install additional dependencies
For running Minkube on none driver we need to install these dependencies also
Other dependencies
3.1 Installing Conntrack
minikube requires connection tracking (conntrack) dependency for the execution of integration tests.
sudo apt-get install conntrack
3.2 Installing crictl
crictl provides a CLI for CRI-compatible container runtimes. This allows the CRI runtime developers to debug their runtime without needing to set up Kubernetes components.
crictl can be downloaded from cri-tools release page:
VERSION="v1.26.0" # check latest version in /releases page


wget https://github.com/kubernetes-sigs/cri-tools/releases/download/$VERSION/crictl-$VERSION-linux-amd64.tar.gz


sudo tar zxvf crictl-$VERSION-linux-amd64.tar.gz -C /usr/local/bin


rm -f crictl-$VERSION-linux-amd64.tar.gz
To install the latest minikube stable release on x86-64 Linux using binary download:
curl -LO https://storage.googleapis.com/minikube/releases/latest/minikube-linux-amd64
sudo install minikube-linux-amd64 /usr/local/bin/minikube
I am trying to run the minikube with the none driver so if you have completed the above steps and try to run the command
3.3 Installing go
Always check the latest version on the official documentation page. https://go.dev/dl
wget https://go.dev/dl/go1.20.5.linux-amd64.tar.gz
sha256sum go1.20.5.linux-amd64.tar.gz
tar -C /usr/local -xvf go1.20.5.linux-amd64.tar.gz
vi ~/.profile
Add the following lines to the end of the file:
export PATH=$PATH:/usr/local/go/bin
source ~/.profile
go version
go version go1.20.5 linux/amd64
3.4 Installing CRI-dockerd
Kubernetes v1.24+, and the Docker container runtime you’ll need to install cri-dockerd on your system.
Kubernetes interacts with Docker through the Container Runtime Interface (CRI) using the separate runtime called “CRI-dockerd.” CRI-dockerd acts as a bridge between Kubernetes and the Docker runtime.
Checkout the latest updates on this github repo for CRI-Dockerd
https://github.com/Mirantis/cri-dockerd
git clone https://github.com/Mirantis/cri-dockerd.git
cd cri-dockerd/
go get && go build -o /usr/local/bin/cri-dockerd
mkdir -p /etc/systemd/system
cp -a packaging/systemd/* /etc/systemd/system
sed -i -e ‘s,/usr/bin/cri-dockerd,/usr/local/bin/cri-dockerd,’ /etc/systemd/system/cri-docker.service
systemctl daemon-reload
systemctl enable cri-docker.service
systemctl enable cri-docker.socket
systemctl status cri-docker.socket
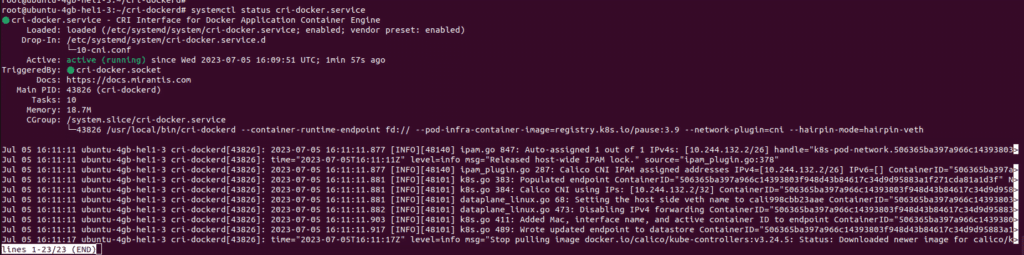
After executing all the commands below you can see the status of the service cri-docker.service using the command systemctl status cri-docker.service.
You must get a running output similar to the below image.
Step 4: Install container network plugins and starting the Minikube.
minikube start –driver=none –network-plugin=cni –cni=calico
Next, I am going to start the minkube using the none driver.cni=calico specifies the Container Network Interface (CNI) plugin to be used with Minikube
By specifying cni=calico, you are instructing Minikube to use the Calico CNI plugin for networking in your Minikube Kubernetes cluster. This means that Calico will be responsible for managing network connectivity and policies for the containers running in the cluster.
Wait for something until the process completes and once the process gets finished you will be able to see all the pods running in the minikube cluster using the command
kubectl get pods -A

Great! That’s it you have successfully installed all the dependencies and started the Minikube cluster.
Summary:
In this article, we have learned how to install Minikube and its dependencies on the ubuntu server.
In the coming articles, we will explore much about Minikube and its components.