Introduction:
Redis is an open-source, in-memory data store that can be used for various purposes, such as caching, real-time analytics, and even as a primary database for certain use cases. One of its key features is the ability to set up a Redis Cluster, which allows you to distribute your data across multiple nodes, ensuring high availability and fault tolerance.
In this blog post, we will walk you through the process of creating a Redis Cluster on Ubuntu. Whether you are a developer, system administrator, or just someone curious about Redis, this guide will provide you with a clear and detailed outline to set up your own Redis Cluster.
In Redis Cluster, nodes are responsible for holding the data, and taking the state of the cluster, including mapping keys to the right nodes.
In Redis cluster mode the nodes are also able to auto-discover other nodes, detect non-working nodes, and promote replica nodes to master when needed in order to continue to operate when a failure occurs.
All nodes are connected with each other using a TCP bus and binary protocol called Redis Cluster Bus
Key features of redis cluster
- Key Hashing: When a key is stored or retrieved in a Redis Cluster, a hash function is applied to the key to determine which hash slot it belongs to. Redis uses the CRC16 algorithm to hash the keys, resulting in a 16-bit integer hash value.
- Distribution: Redis Cluster has a predefined number of hash slots, typically 16384. Each node in the cluster is responsible for a subset of these hash slots. For example, if you have three nodes in your cluster, they might each be responsible for approximately 5461 hash slots.
- Data Sharding: Keys are distributed among the cluster nodes based on the hash slot they belong to. This sharding mechanism ensures that each key falls into a specific node based on its hash value. As a result, data is evenly distributed across the cluster.
- Node Assignment: Redis Cluster maintains a mapping of hash slots to nodes. When a node joins or leaves the cluster, the hash slot mappings are updated to reflect the new cluster topology. This ensures that even when nodes are added or removed, the data remains correctly distributed.
- High Availability: Redis Cluster also provides high availability by replicating data across multiple nodes. Each hash slot typically has one or more replicas on other nodes. If a primary node fails, one of its replicas can be promoted to become the new primary, ensuring data availability.
Read more about Redis Cluster specifications https://redis.io/docs/reference/cluster-spec/
Prerequisites:
Need at least 2 Ubuntu servers with root-level access.
In this article, I am trying to configure the Redis cluster on 2 nodes you can use as much of nodes based on your requirements.
For this demo, i am using 2 servers with IP addresses 10.138.0.2 and 10.180.0.2
All the above steps are done only on one server you need to repeat the step on other equivalent nodes
Installing Redis cluster
Connect to the server using SSH with an account with super-user privileges.
Update the repo and install Redis-server on the machine
 sudo apt-get update
 sudo apt-get install redis-server
 sudo systemctl disable redis-server.service
Create directories for keeping redis configuration files
I am planning to run Redis on ports 8000 8001 and 8002 in one server where 8000 and 8001 will act as masters and the other one act as a slave.
sudo mkdir /etc/redis/cluster
sudo mkdir /etc/redis/cluster/8000
sudo mkdir /var/lib/redis/8000
sudo mkdir /etc/redis/cluster/8001
sudo mkdir /var/lib/redis/8001
sudo mkdir /etc/redis/cluster/8002
sudo mkdir /var/lib/redis/8002
Create configuration and systemd files for Redis to run
Redis on port 8000
Create and edit the configuration file created for Redis master on port 8000
vi /etc/redis/cluster/8000/redis_8000.conf
Copy and paste the below content on that conf file and save the file.
This tells Redis to use port 8000 for the data directory and other configuration files.
port 8000
dir /var/lib/redis/8000/
appendonly no
protected-mode no
cluster-enabled yes
cluster-node-timeout 5000
cluster-config-file /etc/redis/cluster/8000/nodes_8000.conf
pidfile /var/run/redis/redis_8000.pid
logfile /var/log/redis/redis_8000.log
Create a systemd file for the redis-server running on port 8000
vi /etc/systemd/system/redis_8000.service
[Unit]
Description=Redis key-value database on 8000
After=network.target
[Service]
ExecStart=/usr/bin/redis-server /etc/redis/cluster/8000/redis_8000.conf –supervised systemd
ExecStop=/bin/redis-cli -h 127.0.0.1 -p 8000 shutdown
Type=notify
User=redis
Group=redis
RuntimeDirectory=redis
RuntimeDirectoryMode=0755
LimitNOFILE=65535
[Install]
WantedBy=multi-user.target
Start the service using the command systemctl start redis_8000.service
Redis on port 8001
Create another configuration file for the redis_server running on port 8001
port 8001
dir /var/lib/redis/8001/
appendonly no
protected-mode no
cluster-enabled yes
cluster-node-timeout 5000
cluster-config-file /etc/redis/cluster/8001/nodes_8001.conf
pidfile /var/run/redis/redis_8001.pid
logfile /var/log/redis/redis_8001.log
Create systemd configuration file for redis_server running on port 8001
[Unit]
Description=Redis key-value database on 8001
After=network.target
[Service]
ExecStart=/usr/bin/redis-server /etc/redis/cluster/8001/redis_8001.conf –supervised systemd
ExecStop=/bin/redis-cli -h 127.0.0.1 -p 8001 shutdown
Type=notify
User=redis
Group=redis
RuntimeDirectory=redis
RuntimeDirectoryMode=0755
LimitNOFILE=65535
[Install]
WantedBy=multi-user.target
Start the service using the command systemctl start redis_8001.service.
Redis on port 8002
Create a configuration file for redis on port 8002
vi /etc/redis/cluster/8002/redis_8002.conf
Copy and paste the below configurations.
port 8002
dir /var/lib/redis/8002/
appendonly no
protected-mode no
cluster-enabled yes
cluster-node-timeout 5000
cluster-config-file /etc/redis/cluster/8002/nodes_8002.conf
pidfile /var/run/redis/redis_8002.pid
logfile /var/log/redis/redis_8002.log
Create a systemd file to run the redis_8002 service.
vi /etc/systemd/system/redis_8002.service
Copy and paste the below content into that file and save it.
[Unit]
Description=Redis key-value database on 8002
After=network.target
[Service]
ExecStart=/usr/bin/redis-server /etc/redis/cluster/8002/redis_8002.conf –supervised systemd
ExecStop=/bin/redis-cli -h 127.0.0.1 -p 8002 shutdown
Type=notify
User=redis
Group=redis
RuntimeDirectory=redis
RuntimeDirectoryMode=0755
LimitNOFILE=65535
[Install]
WantedBy=multi-user.target
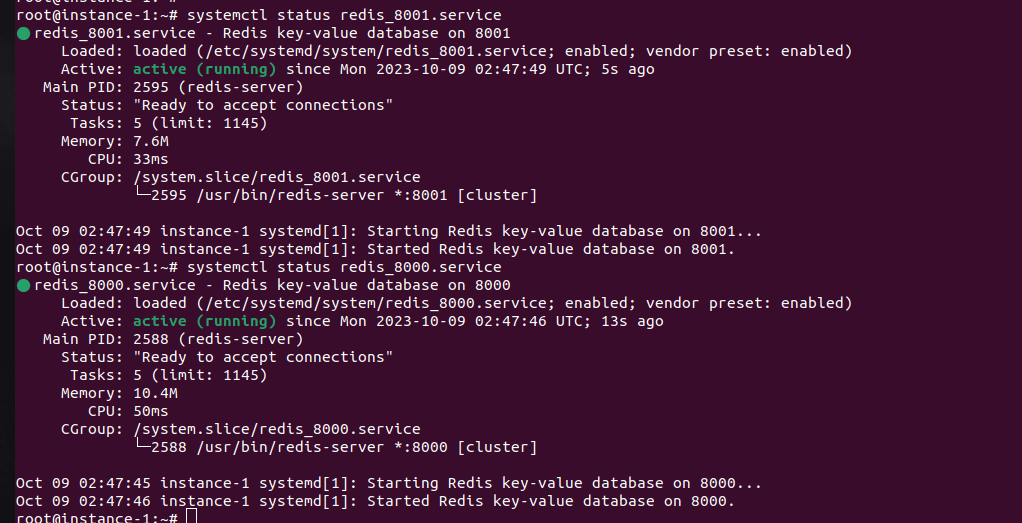
If you have successfully done all the steps you will get the status running the same as the below screenshot for both Redis servers.
Now check the logs for redis and confirm it is working without any errors
sudo tail -n 100 /var/log/redis/redis_8000.log
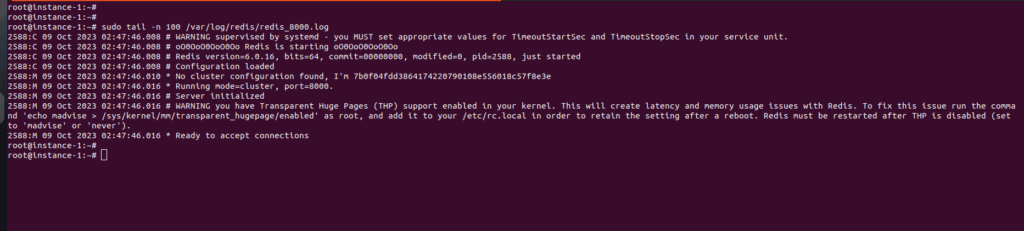
While inspecting the logs you will notice a below WARNING message as shown below.
WARNING you have Transparent Huge Pages (THP) support enabled in your kernel. This will create latency and memory usage issues with Redis. To fix this issue run the command ‘echo madvise > /sys/kernel/mm/transparent_hugepage/enabled’ as root, and add it to your /etc/rc.local in order to retain the setting after a reboot. Redis must be restarted after THP is disabled (set to ‘madvise’ or ‘never’).
2588:M 09 Oct 2023 02:47:46.016 * Ready to accept connections
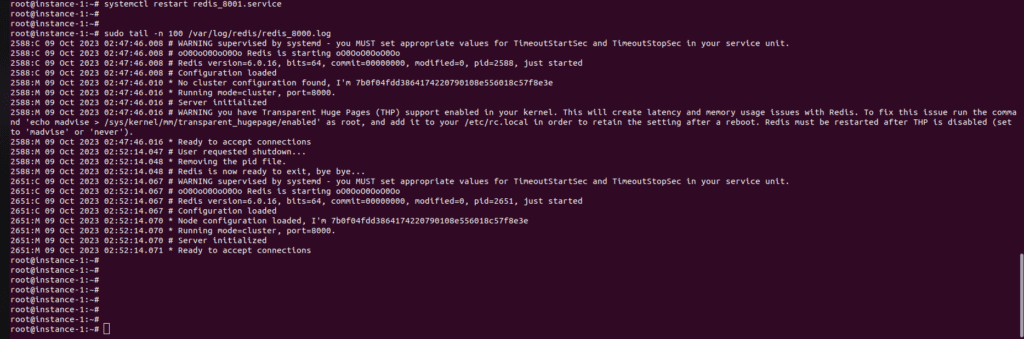
In order to remove this warning run this command as mentioned in the logs echo madvise > /sys/kernel/mm/transparent_hugepage/enabled’.
Also create a /etc/rc.local file and save the below command in order to retain after reboot.
And restart your systemd services
Repeat the above steps for the other Node to create 3 Redis servers running on ports 8000,8001 and 8002 on server 10.180.0.2.
Creating Redis cluster
After repeating the steps in all nodes run the below commands to create the redis cluster here.
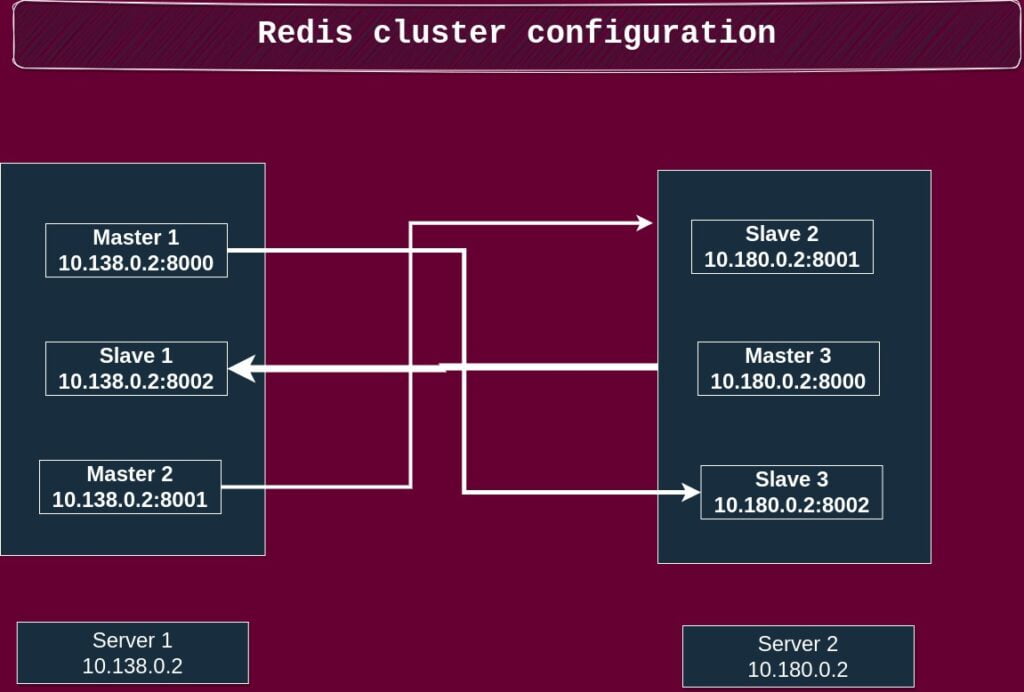
Here i am choosing 2 master’s from server 10.138.0.2 and one from 10.180.0.2.
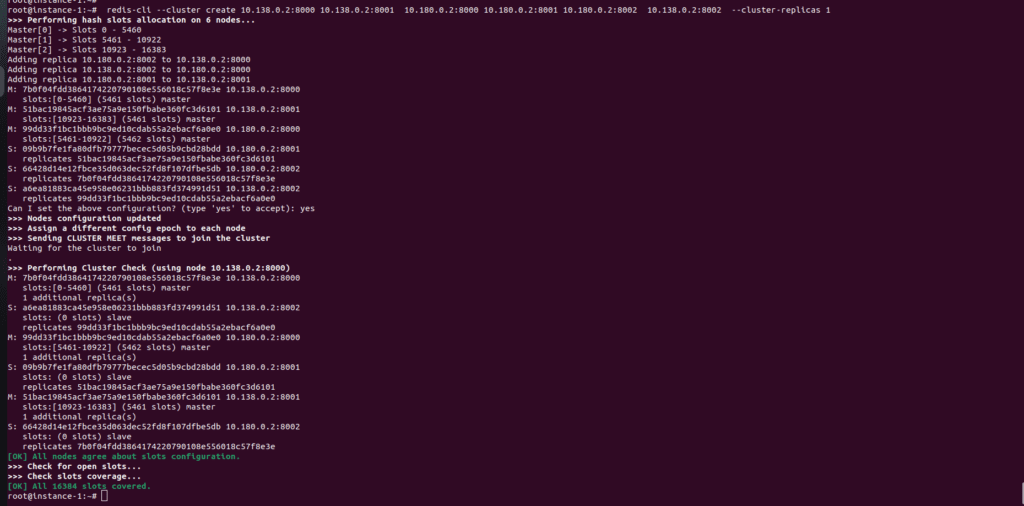
redis-cli –cluster create 10.138.0.2:8000 10.138.0.2:8001 10.180.0.2:8000 10.180.0.2:8001 10.180.0.2:8002 10.138.0.2:8002 –cluster-replicas 1
The master-slave mapping for the above configurations is shown in the below screenshot
Make sure that all the ports are open and the service is running successfully if everything is configured correctly you will get a similar response as shown below.
redis-cli -c -h 10.138.0.2 -p 8000

You can run the command CLUSTER NODES by connecting to the Redis node and see all the connected master and slave nodes
Now connect to any Redis server and run a few SET and GET commands.
10.138.0.2:8000> set a 1
-> Redirected to slot [15495] located at 10.138.0.2:8001
OK
10.138.0.2:8001>
10.138.0.2:8001> set b 2
-> Redirected to slot [3300] located at 10.138.0.2:8000
OK
10.138.0.2:8000> set c 3
-> Redirected to slot [7365] located at 10.180.0.2:8000
OK
10.180.0.2:8000> get b
-> Redirected to slot [3300] located at 10.138.0.2:8000
“2”
10.138.0.2:8000> get a
-> Redirected to slot [15495] located at 10.138.0.2:8001
“1”
10.138.0.2:8001> get c
-> Redirected to slot [7365] located at 10.180.0.2:8000
“3”
As you can see Redis Cluster divides the data into hash slots, and each node is responsible for specific slots. When you perform operations on keys, Redis Cluster automatically routes the commands to the correct nodes based on the hash slots, ensuring data distribution and high availability. Redirection is used to guide clients to the correct node when needed. This setup allows Redis to horizontally scale and handle large datasets while providing fault tolerance.
Summary:
That’s it now you have created a redis cluster in your ubuntu machine.