Creating partitions in Linux will help you to split your hard drive into multiple units and act independently.
In Linux, we can use the parted or fdisk command Linux utility to create and modify your partitions.
Fdisk is the most commonly used because of its easiness
In this tutorial, you will learn how to create a partition in Linux using fdisk.
Partitions can be divided into 3 types.
Primary: Holds the operating system files. Only four primary partitions can be created.
Extended – Special type of partition in which more than the four primary partitions can be created.
Logical – Partition that has been created inside of an extended partition.
Step 1: List the current partitions available using fdisk
fdisk -l
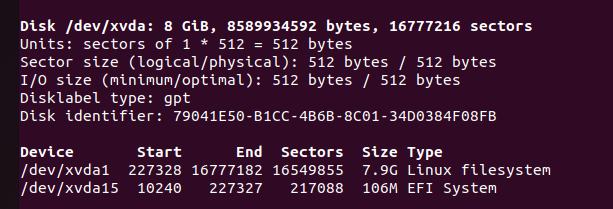
By default, you will have only one partition ie created automatically.
Here /dev/xvda is the primary disk and has 2 partitions one holds the Linux file system which consists of 7.9GB of space on the other contains a boot load of 106 MB.
I have mounted a separate volume in this server of 20 GB of space in which 17GB is available to use.
lsblk
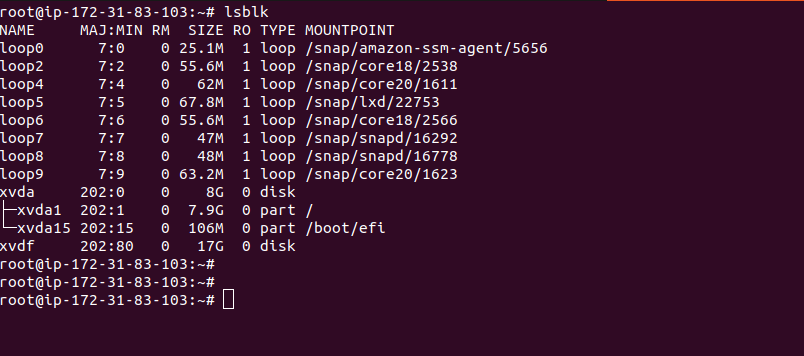
In this tutorial we are going to work with the volume /dev/xvdf which has a total 17Gb of space we will make 2 partitions of 8GB and mount them in separate directories.
Step 2: Select the storage disk.
Select the storage in which you want to create the partitions here /dev/xvdf.
sudo fdisk /dev/xvdf
Step 3: Create a new partition.
Type the m command in order to list all the available options in the fdisk

In the fdisk interactive menu, you can enter the p character to view a list of existing partitions on the disk. This will display a list of the existing partitions on the disk, along with their size, type, and other information. Here we don’t have any existing partitions hence it will not show up.
In order to add a new partition type the n command.
Select between primary and extended partition here I am creating a primary partition.
After that Select a number for the partition.
After that, you are asked for the starting and ending sectors of your hard drive. Leave the starting sector as default and at the last sector enter the size for which we want to create a partition here I am entering +8G.
A successful message will appear like creating a new partition with size +8G after that write the data using the w command.

Step 4 : Verify the partition’s created.
I have created 2 partitions of size 8Gb in this example in order to verify it using the fdisk -l command.
fdisk -l
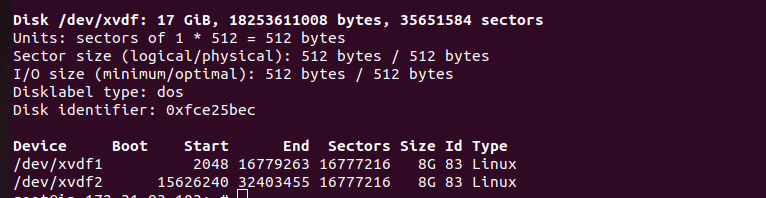
As you can see below screenshot our volume was /dev/xvdf which consisted of 17Gb of space in which we have created 2 partitions /dev/xvdf1 and /dev/xvdf2 of size 8Gb
Step 5: Format the partitions with ext4 filesystem
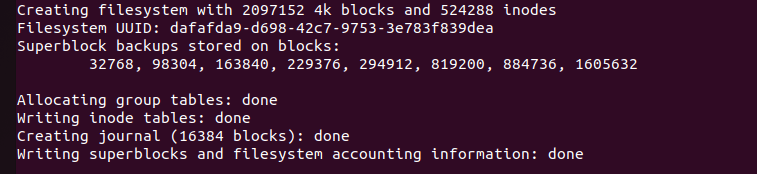
You need to properly format both partitions with the ext4 filesystem inorder to use the partitions. For that use the mkfs command.
mkfs -t ext4 /dev/xvdf1
mkfs -t ext4 /dev/xvdf2
Formatting the partitions will produce an output similar to this.
Step 6: Mounting the partitions.
Here I am mounting /home in one partition and /backup in another partition.
/home is created by default so I am creating a directory called /backup
mount /dev/xvdf1 /home/
mount /dev/xvdf2 /backup/
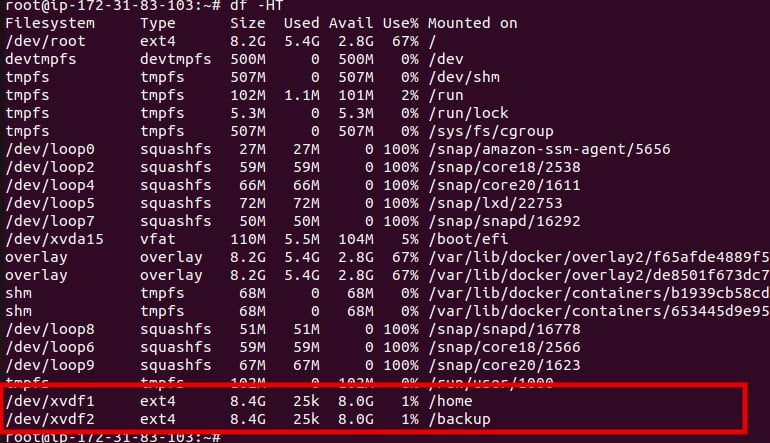
As you can see both partitions are created and mounted successfully.
in order to permanently mount the filesystem you need to add the entry in /etc/fstab.
Using the lsblk command to list the available block devices on your system. Identify the device name (e.g., /dev/sda) of the partition you want to delete.
Next, use the sudo fdisk /dev/[device name] command to start the fdisk utility, replacing “[device name]” with the actual device name of your partition.
Remove Linux partitions.
- Run the following command to start fdisk with the appropriate disk:
sudo fdisk /dev/sdXReplace “sdX” with the letter corresponding to the disk containing the partition you want to remove (e.g., sda, sdb, etc.). - Press “p” to print the current partition table and verify the partition you want to remove.
- Note the partition number you want to delete.
- Press “d” to delete a partition and enter the partition number when prompted.
- Press “w” to write the changes and exit fdisk.
- After the changes are written, the partition will be removed from the disk.
Summary:
After following this tutorial, you should be able to create, format, mount and delete a partition in Linux.