
In this article, we will learn what is NFS and how to configure it on the ubuntu server. The network file system(NFS) which was developed in 1980 allows us to mount the file system in the network and remote users can interact and share just like local files and folders.
NFS (Network File System): Definition and Top Use Cases
NFS (Network File System) is a distributed file system protocol that allows users to access files and directories located on remote servers over a network.NFS is useful for sharing files because it enables multiple users to access the same files and directories simultaneously. With NFS, files can be shared across multiple servers, and users can access them as if they were stored locally on their own machines.
Main uses cases of NFS
Data sharing: We often get requirements where we need to store data from multiple servers in a single storage location we can consider NFS in these cases:
Disaster recovery: it can be used as a part of disaster recovery where the critical data can be easily backed up and restored from a remote backup server.
High availability: NFS supports failover and load balancing, making it possible to provide high availability for file services across multiple servers.
In this blog, we are going to install and configure an NFS file share in the ubuntu server
Prerequisites
In this tutorial, we are going to name the server which shares the directories via NFS as the host and the server that mounts these directories as the client.
Outcome: We are going to share the directory /home/nfsshare from the host server via NFS and mount it in another server with the mount point /home/nfsclient.
Installing and Configuring NFS on the Host
Update the repo using this command
apt update
Install NFS-server using apt:
Run the following command to install the NFS server package
sudo apt-get install nfs-kernel-server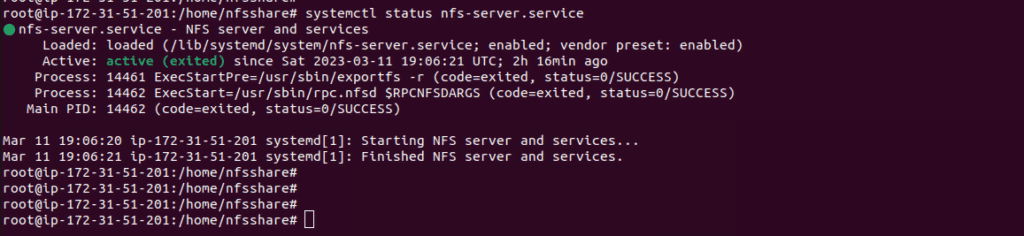
After successful installation, you will be able to see the NFS service is running successfully.
Create a shared directory:
Next, Choose a directory that you want to share and create it with the following command:
sudo mkdir /home/nfsshareSet the directory permissions:
Set the correct permissions for the shared directory so that it can be accessed by other machines on the network:
sudo chown nobody:nogroup /home/nfsshare
sudo chmod 777 /home/nfsshare
Configure the NFS server:
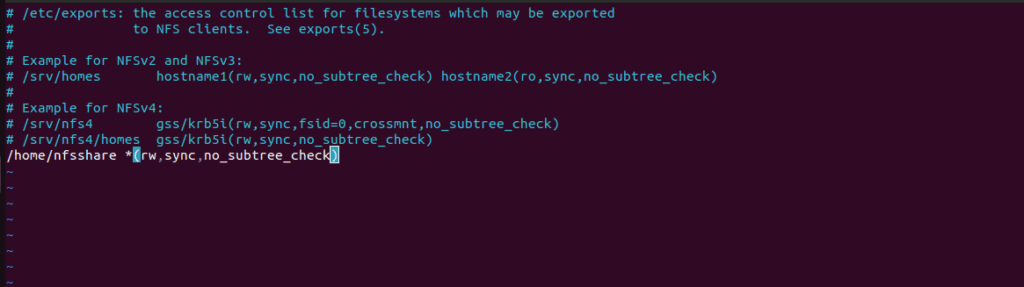
The /etc/exports the file is a configuration file used by the NFS server to specify which directories or file systems should be made available for remote clients to access.
Edit the exports file by running the following command
sudo vi /etc/exportsAdd the shared directory to the exports file:
In the exports file, add the following line to allow access to the shared directory:
/home/nfsshare *(rw,sync,no_subtree_check)This line allows all machines on the network to access the shared directory with read/write permissions.RW means allowing read-write access to users for this shared directory, sync option indicates that changes made by clients to the shared directory should be immediately written to disk on the NFS server.
Save and close the exports file
Restart the NFS server:
Run the following command to restart the NFS server and apply the changes:
sudo systemctl restart nfs-kernel-serverAllow remote access
Here * indicates that all machines are allowed to access the shared directory if you want to only enable remote access you need to specify the IP address range of the remote machines that you want to allow to access the NFS share. To do this, replace the * in the exports file with the IP address range that you want to allow. For example, if you want to allow access from the IP range 192.168.1.0/24, the exports line would look like this
/path/to/shared/directory 192.168.1.0/24(rw,sync,no_subtree_check)
Your NFS share is now configured and ready to be accessed from other machines on the network. Next, we can test out the NFS file share by mounting it to our client.
How to mount the NFS file share on the client
The first step is to install nfs-common package which includes NFS functionality without any server components.
Install the NFS client package: Open the terminal on your Ubuntu machine and run the following command to install the NFS client package:
sudo apt-get install nfs-commonCreate a mount point: Choose a directory where you want to mount the NFS share and create a mount point with the following command:
sudo mkdir /home/nfsclientMount the NFS share: Run the following command to mount the NFS share:
sudo mount <nfs-server-ip>:/path/to/shared/directory /path/on/clientReplace <nfs-server-ip> with the IP address of the NFS server, and /path/to/shared/directory with the path to the directory is the directory in the NFS host. For example, if the NFS server IP address is 54.221.181.76 and the shared directory is located at /home/nfsclient on the NFS host , the mount command would be:
sudo mount54.221.181.76:/home/nfsshare/home/nfsclient
Run the following command to verify that the NFS share is mounted:
df -h
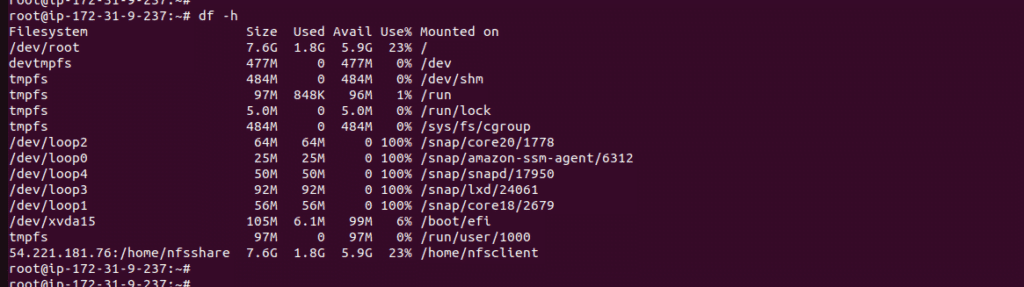
This command will show you a list of all mounted file systems on your system. Look for the line that shows the NFS share that you just mounted.
Here we can see the last line which indicates our NFS mount point.
Make the mount persistent: To ensure that the NFS share is mounted automatically at boot time, you need to add an entry to the /etc/fstab file.
sudo vi /etc/fstabAdd the following line to the end of the file:
<nfs-server-ip>:/home/nfsshare /home/nfsclient nfs defaults 0 0Save and close the file.
To umount the nfs fileshare use the command
umount /home/nfsclient
That’s it! The NFS share is now mounted on your Ubuntu machine and will be automatically mounted at boot time. Now you can test the working by creating a test file in the /home/nfsclient directory it will be visible in the client on the /home/nfsshare directory in the host or vice-versa.
Summary:
In this tutorial, you have learned what NFS is and how to install and configure it on your ubuntu machine.


