
Kubernetes has become the de facto standard for container orchestration, providing a powerful and flexible platform for deploying, scaling, and managing containerized applications. In this tutorial, we will walk you through setting up a Kubernetes cluster using kubeadm and configuring the container runtime with containerd. Additionally, we’ll install the flannel Network Interface (CNI) to enable pod communication within the cluster.
Step 1. Configuring Control Node and Worker Nodes.
Prerequisites
Before starting, ensure you have the following:
- A compatible Linux host. The Kubernetes project provides generic instructions for Linux distributions based on Debian and Red Hat, and those distributions without a package manager.
- 2 GB or more of RAM per machine (any less will leave little room for your apps) 2 CPUs or more.
- Full network connectivity between all machines in the cluster (public or private network is fine).
- Unique hostname, MAC address, and product_uuid for every node. See here for more details.
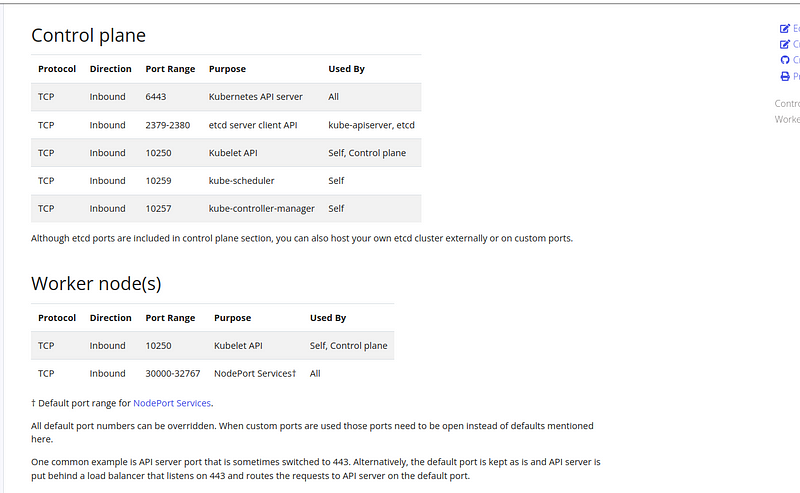
- Certain ports are open on your machines. See here for more details.
Make sure that these ports shown below are opened in the firewall for both the control and the worker node.
Disable Swap
Kubernetes requires swap to be disabled on all nodes. Run the following commands to disable swap and remove its entry from /etc/fstab
sudo sed -i '/ swap / s/^/#/' /etc/fstab
sudo swapoff -a
Step 2. Installing Container Runtime Interface (contained).
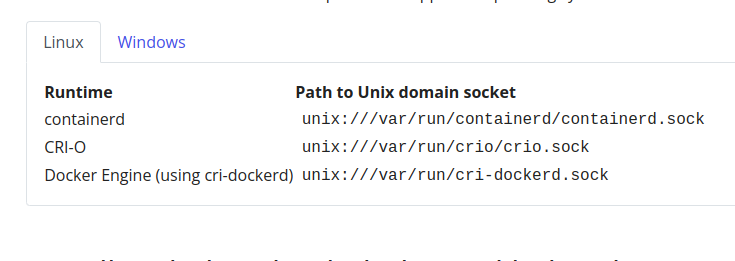
By default, Kubernetes uses the Container Runtime Interface (CRI) to interface with your chosen container runtime.
If you don’t specify a runtime, kubeadm automatically tries to detect an installed container runtime by scanning through a list of known endpoints.
If multiple or no container runtimes are detected kubeadm will throw an error and will request that you specify which one you want to use. See container runtimes for more information.
https://kubernetes.io/docs/setup/production-environment/container-runtimes/
Install and configure prerequisites
cat <<EOF | sudo tee /etc/modules-load.d/k8s.conf
overlay
br_netfilter
EOF

sudo modprobe overlay
sudo modprobe br_netfilter

# sysctl params required by setup, params persist across reboots
cat <<EOF | sudo tee /etc/sysctl.d/k8s.conf
net.bridge.bridge-nf-call-iptables  = 1
net.bridge.bridge-nf-call-ip6tables = 1
net.ipv4.ip_forward                 = 1
EOF

# Apply sysctl params without reboot
sudo sysctl --system
Verify that the br_netfilter, overlay modules are loaded by running the following commands:
lsmod | grep br_netfilter
lsmod | grep overlay
Verify that the net.bridge.bridge-nf-call-iptables, net.bridge.bridge-nf-call-ip6tables, and net.ipv4.ip_forward system variables are set to 1 in your sysctl config by running the following command:
sysctl net.bridge.bridge-nf-call-iptables net.bridge.bridge-nf-call-ip6tables net.ipv4.ip_forward
In this demo, we are going to install contained
The official binary releases of containerd are available for the amd64 (also known as x86_64) and arm64 (also known as aarch64) architectures.
check your system architecture using uname -a command and matching container runtime architecture.
uname -a
Linux ubuntu-8gb-hel1–1 5.4.0–150-generic #167-Ubuntu SMP Mon May 15 17:35:05 UTC 2023 x86_64 x86_64 x86_64 GNU/Linu
This output shows that I have amd64 (also known as x86_64) architecture so I am going to install that particular runtime version
By the time of this article, v1.7.2 was the latest containerd version check out the latest releases on the GitHub repo
https://github.com/containerd/containerd/blob/main/docs/getting-started.md
wget https://github.com/containerd/containerd/releases/download/v1.7.2/containerd-1.7.2-linux-amd64.tar.gz
sudo tar Cxzf /usr/local containerd-1.7.2-linux-amd64.tar.gz
Running as Containerd as systemd service.
If you intend to start containerd via systemd, you should also download the containerd.service unit file from https://raw.githubusercontent.com/containerd/containerd/main/containerd.service into /usr/local/lib/systemd/system/containerd.service, and run the following commands.
wget https://raw.githubusercontent.com/containerd/containerd/main/containerd.service
mv containerd.service /etc/systemd/system/
systemctl enable --now containerd
systemctl status containerd.service
systemctl daemon-reload
systemctl enable --now containerd
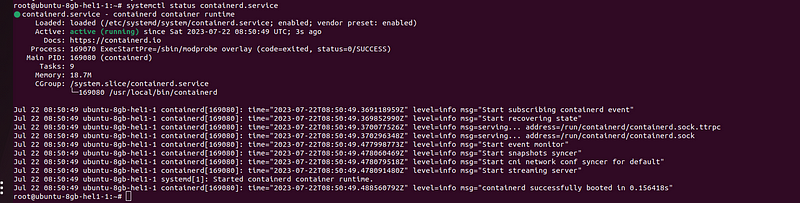
After successful installation of contianerd you will be able to see the running status of the service as shown in the above image.
cgroup drivers
On Linux, control groups are used to constrain resources that are allocated to processes.
Both the kubelet and the underlying container runtime need to interface with control groups to enforce resource management for pods and containers and set resources such as cpu/memory requests and limits.
To interface with control groups, the kubelet and the container runtime need to use a cgroup driver.
It’s important that the kubelet and the container runtime must use the same cgroup driver.
There are two cgroup drivers available for CRI :
The cgroupfs driver is not recommended when systemd is the init system because systemd expects a single cgroup manager on the system. Additionally, if you use cgroup v2, use the systemd cgroup driver instead of cgroupfs.
Use systemd as the cgroup driver.
mkdir -p /etc/containerd/
containerd config default > /etc/containerd/config.toml
cat <<EOF | sudo tee /etc/containerd/config.toml
[plugins."io.containerd.grpc.v1.cri"]
  ...
  [plugins."io.containerd.grpc.v1.cri".containerd.runtimes.runc]
    ...
    [plugins."io.containerd.grpc.v1.cri".containerd.runtimes.runc.options]
      ...
      systemd_cgroup = true
EOF
we have configured the cgroup driver for the container runtime but we need to make sure thatsystemd as the cgroup driver for the kubelet also.
Note: In v1.22 and later, if the user does not set the
cgroupDriverfield underKubeletConfiguration, kubeadm defaults it tosystemd.
As we are running v1.26 the default cgroup driver in kubelet is also systemd.
Installing runc
Download the runc.<ARCH> binary from https://github.com/opencontainers/runc/releases , verify its sha256sum, and install it as /usr/local/sbin/runc or /usr/sbin/runc.
wget https://github.com/opencontainers/runc/releases/download/v1.1.8/runc.amd64
install -m 755 runc.amd64 /usr/sbin/runc
The binary is built statically and should work on any Linux distribution.
Step 3. Installing Kubernetes CLI Tools.
Install kubeadm, kubelet, and kubectl.
- kubeadm: the command to bootstrap the cluster.
- kubelet: the component that runs on all of the machines in your cluster and does things like starting pods and containers.
- kubectl: the command line util to talk to your cluster.
For Debian-based distributions
sudo apt-get update sudo apt-get install -y apt-transport-https ca-certificates curl
curl -fsSL https://packages.cloud.google.com/apt/doc/apt-key.gpg | sudo gpg --dearmor -o /etc/apt/keyrings/kubernetes-archive-keyring.gpg
echo "deb [signed-by=/etc/apt/keyrings/kubernetes-archive-keyring.gpg] https://apt.kubernetes.io/ kubernetes-xenial main" | sudo tee /etc/apt/sources.list.d/kubernetes.list
sudo apt-get update
sudo apt-get install -y kubelet kubeadm kubectl
sudo apt-mark hold kubelet kubeadm kubectl
For redhat distributions
cat <<EOF | sudo tee /etc/yum.repos.d/kubernetes.repo
[kubernetes]
name=Kubernetes
baseurl=https://packages.cloud.google.com/yum/repos/kubernetes-el7-\$basearch
enabled=1
gpgcheck=1
gpgkey=https://packages.cloud.google.com/yum/doc/rpm-package-key.gpg
exclude=kubelet kubeadm kubectl
EOF

# Set SELinux in permissive mode (effectively disabling it)
sudo setenforce 0
sudo sed -i 's/^SELINUX=enforcing$/SELINUX=permissive/' /etc/selinux/config

sudo yum install -y kubelet kubeadm kubectl --disableexcludes=kubernetes

sudo systemctl enable --now kubelet
For redhat distributions:
Setting SELinux in permissive mode by runningsetenforce 0andsed ...effectively disables it. This is required to allow containers to access the host filesystem, which is needed by pod networks for example. You have to do this until SELinux support is improved in the kubelet.
You can leave SELinux enabled if you know how to configure it but it may require settings that are not supported by kubeadm.
If the
baseurlfails because your Red Hat-based distribution cannot interpretbasearch, replace\$basearchwith your computer’s architecture. Typeuname -mto see that value. For example, thebaseurlURL forx86_64could be:https://packages.cloud.google.com/yum/repos/kubernetes-el7-x86_64
Repeat steps 1–3 on all worker nodes
Step 4: Set up the Kubernetes Cluster (only on the master node)
Initialize the Kubernetes master node using Kubeadm:
We are using the pod-network-cidr=10.244.0.0/16 which is the default one for the flannel CNI plugin.
sudo kubeadm init --pod-network-cidr=10.244.0.0/16
You must deploy a Container Network Interface (CNI) based Pod network add-on so that your Pods can communicate with each other. Cluster DNS (CoreDNS) will not start up before a network is installed.
Take care that your Pod network must not overlap with any of the host networks: you are likely to see problems if there is any overlap. (If you find a collision between your network plugin’s preferred Pod network and some of your host networks, you should think of a suitable CIDR block to use instead, then use that during
kubeadm initwith--pod-network-cidrand as a replacement in your network plugin’s YAML)By default,
kubeadmsets up your cluster to use and enforce use of RBAC (role based access control). Make sure that your Pod network plugin supports RBAC, and so do any manifests that you use to deploy it.If you want to use IPv6 — either dual-stack, or single-stack IPv6 only networking — for your cluster, make sure that your Pod network plugin supports IPv6. IPv6 support was added to CNI in v0.6.0.
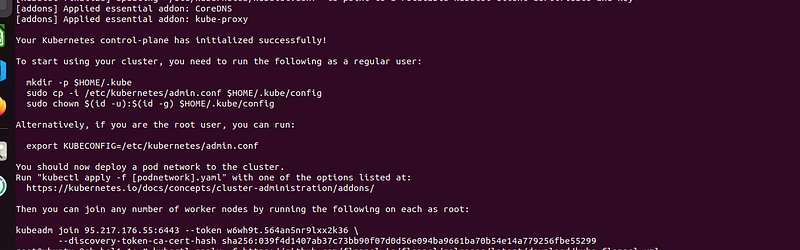
After running the kubeadm init command you will probably get this output.
Take note of the kubectl join command this command needs to enter the other worker nodes to join the cluster.
To start using your cluster, you need to run the following as a regular user:
mkdir -p $HOME/.kube
 sudo cp -i /etc/kubernetes/admin.conf $HOME/.kube/config
 sudo chown $(id -u):$(id -g) $HOME/.kube/config
Alternatively, if you are the root user, you can run:
export KUBECONFIG=/etc/kubernetes/admin.conf
You should now deploy a pod network to the cluster.
Run “kubectl apply -f [podnetwork].yaml” with one of the options listed at:
https://kubernetes.io/docs/concepts/cluster-administration/addons/
Step 5: Install the flannel CNI plugin(only on the master node)
The CNI is essential for enabling communication between pods within the cluster. We will use flannel as the CNI in this tutorial.
kubectl apply -f https://github.com/flannel-io/flannel/releases/latest/download/kube-flannel.yml
Wait for a few seconds and you can see all your pods in running status similar to the below image.

Step 6: Join Worker Nodes in the Cluster
In order to join the worker node cluster the steps from 1–4 must be completed on the worker node.
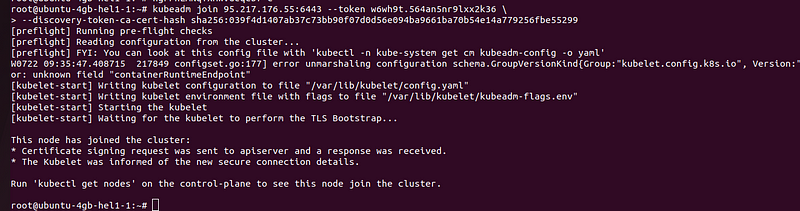
Enter the kubeadm join you copied in step 5 on your worker nodes.
kubeadm join 95.217.176.55:6443 - token <token>\
 - discovery-token-ca-cert-hash sha256:<hash>
Now you can check the status of the worker node from the control plane using the command
kubectl get nodes
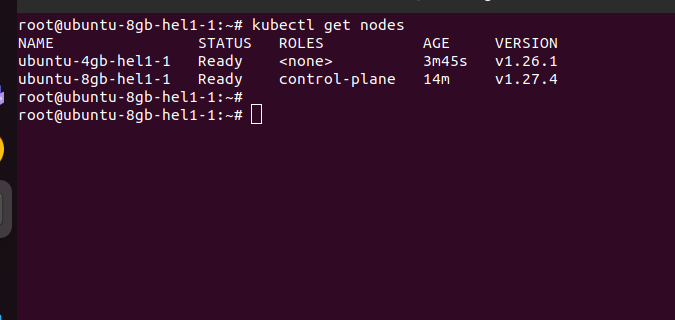
You will get a response similar to this which means your worker node has successfully joined the cluster.
Step 7: Deploy a nginx pod to the cluster.
For testing the functionality we are deploying a sample nginx pod to the cluster.
kubectl run nginx --image=nginx
After the pod has been created successfully you can describe the pod using the command
kubectl describe pod nginx
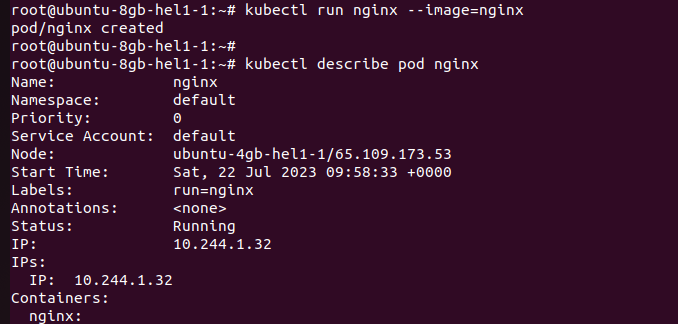
You can see in the above image the pod got created into our worker node ubuntu-4gb-hel1–1 with the internal IP address 10.244.1.32.
Summary:
That’s it now you have deployed a Kubernetes cluster using kubeadm.


