Introduction
In Kubernetes, a pod is the smallest object it is a group of one or many containers having a shared storage network and specification of how to run the containers. But Kubernetes doesn’t stop there; it introduces Services to ensure seamless communication, ReplicationSets for high availability, and Deployments for effortless scaling. Ingress orchestrates external access, like a grand entrance to the performance.
These components work together to provide highly available scalable efficient containerized applications running in the system.
In this article, we are going to cover the main components such as pods, services, replica sets, deployments and ingress using all these we will run an application in Kubernetes.
Pods
Container evolved from the concept of Linux namespaces and groups, Pod is also similar to containers.
A Pod is similar to a set of containers with shared namespaces and shared filesystem volumes.
Let’s get into simple terms
A Pod in Kubernetes is a bit like a team of workers in a shared office. They work together, but they also have their own private spaces. Now, think of these private spaces as separate rooms within the office.
These rooms ensure that each worker can do their job without bothering others. They have their own set of rules, like how loud they can be or how much space they can use. These rules are similar to namespaces and cgroups, which help keep things organized and isolated, just like the rooms in our shared office.
So, a Pod is like a team of workers in an office, each with their own room (namespace and cgroup) to work independently, while still collaborating with their teammates.
So we understood that pods are similar to containers and they work behind the principle of Linux namespaces and cgroup. But pods are not containers inside the pods we run containerized applications also we can run one or many containers within a pod.
Below I will provide a sample template to create a pod that runs nginx image in kuberenets.
apiVersion: v1
kind: Pod
metadata:
  name: nginx
spec:
  containers:
  - name: nginx
    image: nginx:1.14.2
    ports:
    - containerPort: 80
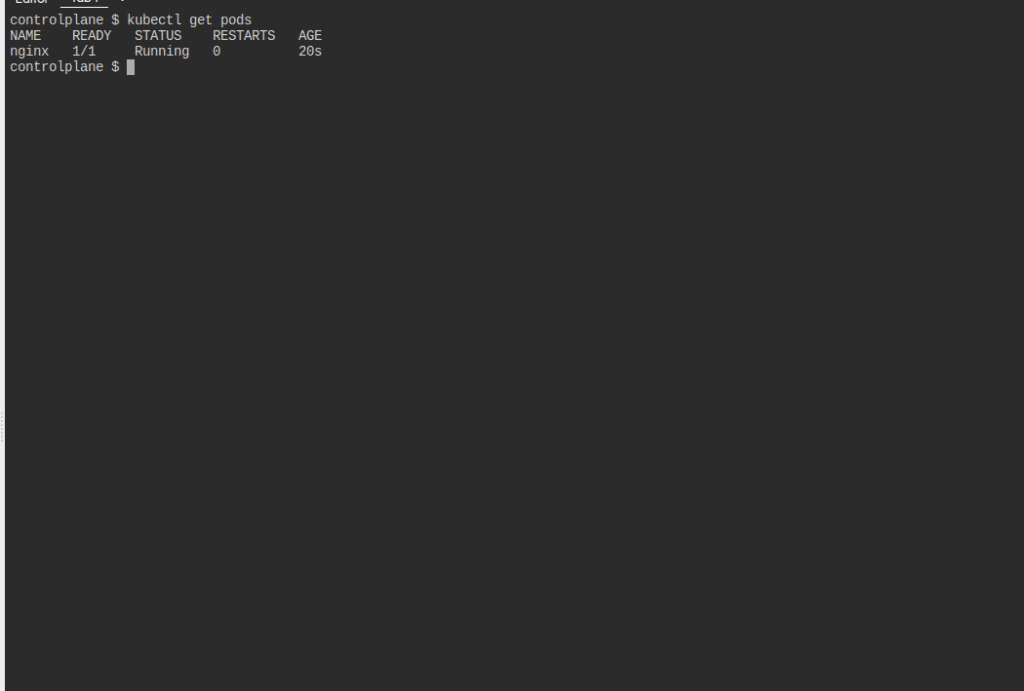
Save this file in yaml format and create the pod using kubectl apply -f pod.yaml
and your pod will be successfully deployed and you must be able to see the nginx container running using the command “kubectl get pods” as shown in the below image.
Using this method we can run any container image as a pod but what if the image is stored in a private docker registry?
You can create a Kubernetes secret to store the registry username and password.
kubectl create secret docker-registry name-secrets –docker-username=username –docker-password=pass1234 –docker-server=registry.example.net
You can also create this secret using yaml file.
You can refer to the below documentation for more details
pull-image-private-registry.
Let’s say you have created a secret named docker-login, After that you can refer to that secret in your pod manifest file to pull images for the private docker registry.
apiVersion: v1
kind: Pod
metadata:
  name: nginx-pod
spec:
  containers:
  - name: nginx
    image: your-registry/nginx:1.14.2
    ports:
    - containerPort: 80
  imagePullSecrets:
  - name: docker-login
This is all about pod but in Kubernetes, we usually do not rely on pod manifest directly because this cannot handle replicas, deployments etc So let’s look at what is a replicaset in Kubernetes next.
Replica set
Now we learned to create pods but what if I want to run 3 replicas of my pod?
Who is responsible for managing replicas in a pod?
Replicaset is a component in Kubernetes that is responsible for managing replicas of a pod.
We can define the replicas under the pod’s spec section; after that, Kubernetes will automatically create replicas based on the count we provided.
Coming to the manifest of the replica set there is a slight difference.
apiVersion: apps/v1
kind: ReplicaSet
metadata:
  name: nginx-rs
spec:
  replicas: 3
  selector:
    matchLabels:
      app: nginx
  template:
    metadata:
      labels:
        app: nginx
    spec:
      containers:
      - name: nginx
        image: registry.e2enetworks.net/your-username/nginx:1.14.2
        ports:
        - containerPort: 80
      imagePullSecrets:
      - name: name-secrets
We define a ReplicaSet named nginx-rs with replicas 3 to specify that we want three replicas of the Pod running.
The selector field is set to matchLabels with the label app: nginx, which matches the label defined in the Pod template. This ensures that the ReplicaSet manages Pods with the same label.
The Pod template is the same as in the previous example, but it has been included within the template field of the ReplicaSet.

You can check the status of replicaset using the command
kubectl get replicaset
Also, you can check the status of the pod using the command
kubectl get pods
You will be able to see 3 pods in running state.
Now we have also learned the replica set but in the production application, we don’t use replicas directly to deploy the pod instead we use deployments ReplicaSet only manages the desired number of replicas of a pod. Deployment provides a mechanism for rolling updates and rollbacks of the application, enabling seamless updates and reducing downtime. Applications must be manually updated or rolled back.
Deployments
You describe a desired state in a Deployment, and the Deployment Controller changes the actual state to the desired state at a controlled rate. You can define Deployments to create new ReplicaSets or to remove existing Deployments and adopt all their resources with new Deployments.
apiVersion: apps/v1
kind: Deployment
metadata:
  name: nginx-deployment
spec:
  replicas: 3
  selector:
    matchLabels:
      app: nginx
  template:
    metadata:
      labels:
        app: nginx
    spec:
      containers:
      - name: nginx
        image: registry.e2enetworks.net/your-username/nginx:1.14.2
        ports:
        - containerPort: 80
      imagePullSecrets:
      - name: name-secrets
  strategy:
    type: RollingUpdate
    rollingUpdate:
      maxUnavailable: 1
      maxSurge: 1
We’ve added the strategy field within the spec section.
type: RollingUpdate specifies that you want to use a rolling update strategy.
rolling update contains additional configuration for the rolling update:
maxUnavailable: 1 specifies the maximum number of unavailable Pods during the update. In this case, it’s set to 1, meaning one old Pod can be unavailable at a time during the update.
maxSurge: 1 specifies the maximum number of new Pods that can be created above the desired number of replicas. Setting it to 1 means one new Pod can be created at a time during the update.
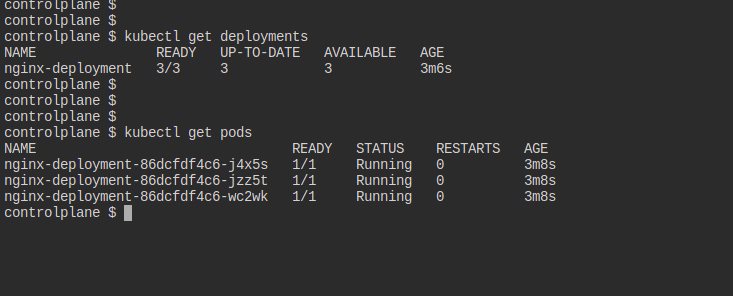
You can check the status of your deployment using the command
kubectl get deployments
This is the advantage of using deployments over replica set we can define our deployment strategy so that during new version releases the application will not the inaccessible.
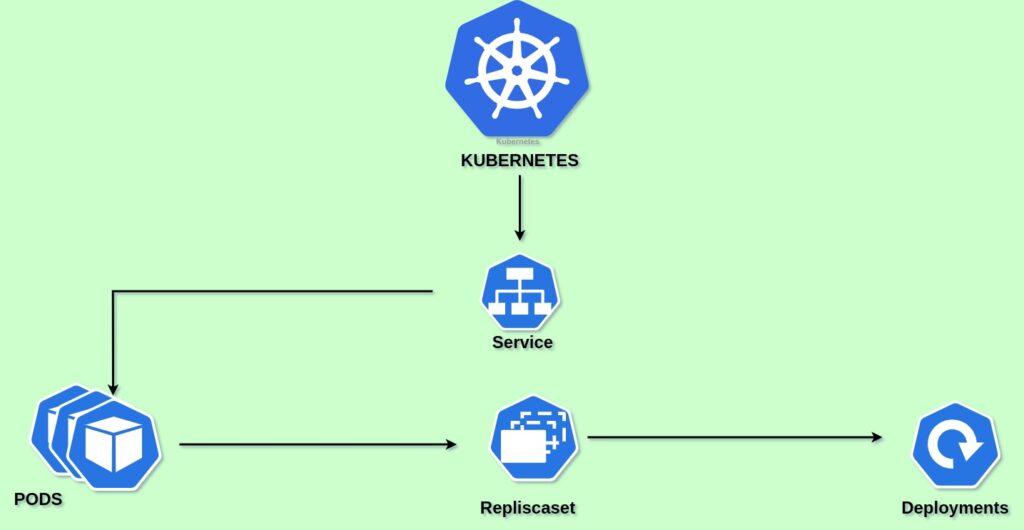
Now we have learned 3 types of Kubernetes objects such as pods, replica sets and deployments.
3 of these are used to run a containerized application in Kuberenets in different ways but how can we access the application running in Kuberenets externally or internally?
For that, we use another object called services.
Services
We have already covered Kubernetes services and how to expose a pod using Kubernetes services in our previous articles.
easily-deploy-a-pod-on-minikube-cluster
Kubernetes services helped us to expose a pod externally to the public.
There are 3 types of services mainly node port, clusterip and load balancer.
ClusterIP Exposes the Service on a cluster-internal IP. Choosing this value makes the Service only reachable from within the cluster. This is the default that is used if you don’t explicitly specify a type for a Service. You can expose the Service to the public internet using an Ingress or a Gateway.
NodePort Exposes the Service on each Node’s IP at a static port (the NodePort). To make the node port available, Kubernetes sets up a cluster IP address, the same as if you had requested a Service of type: ClusterIP.(30000 – 32767)
LoadBalancer Exposes the Service externally using an external load balancer. Kubernetes does not directly offer a load-balancing component; you must provide one, or you can integrate your Kubernetes cluster with a cloud provider.
ExternalName Maps the Service to the contents of the externalName field (for example, to the hostname api.foo.bar.example). The mapping configures your cluster’s DNS server to return a CNAME record with that external hostname value. No proxying of any kind is set up.
There are 3 types of ports while coming to service in Kubernetes.
port: The port field defines the port number on which the Service will listen for incoming traffic. It is the port number that external clients or other Services will use to access the Service. When traffic is directed to this port on the Service’s IP address, Kubernetes will forward that traffic to the targetPort on selected Pods.
targetPort: The targetPort field specifies the port number on the Pods that the Service should send the incoming traffic to. It represents the port on which the application inside the Pod is listening. The targetPort is used to determine which port on the Pod should receive the traffic forwarded by the Service. if you only specify the port in your Kubernetes Service YAML file without explicitly specifying the targetPort, Kubernetes will use the same port number as the targetPort. In such cases, the incoming traffic received on the port of the Service will be forwarded to the Pods on the same port.
Nodeport: The port on which the node exposes the services. If we didn’t specify a node port in our service file Kubernetes automatically assigns a node port in the range of (30000 – 32767).
Here we can expose the Nginx pod using the node port to port 30848 port so that we can access it using our nodeip address and port.
apiVersion: v1
kind: Service
metadata:
  name: my-nodeport-service
spec:
  type: NodePort
  selector:
    app: nginx
  ports:
    - name: http
      port: 80
      nodePort: 30848
If you are on a cloud provider that supports LoadBalancer services (e.g., AWS, GCP, Azure), you can create a LoadBalancer Service. The cloud provider will provision an external load balancer that distributes traffic to your Pods.
apiVersion: v1
kind: Service
metadata:
  name: nginx-service
spec:
  selector:
    app: nginx
  ports:
    - protocol: TCP
      port: 80
      targetPort: 80
  type: LoadBalancer
Using this method you can directly access the nginx using the load balancer IP address
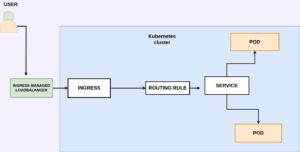
Also if you want to expose the application internally you can use cluster type and an ingress controller to route the traffic from external to the nginx application
Will cover these topics in the upcoming articles
Summary:
In this article, we have learned the basic Kubernetes services like a pod, replica set, deployments, services etc.