In this article, we are going to deploy a nginx server and a varnish cache
We have already learned how to install Nginx webserver and deploy a website in it in our previous articles How to install Nginx in Ubuntu 20.04.
Varnish Cache is an HTTP accelerator designed to significantly improve the performance of web servers. It works by storing a copy of the requested web pages in memory, allowing subsequent requests to be served directly from the cache rather than processing them from the web server. This reduces server load, accelerates content delivery, and enhances overall website responsiveness. Varnish Cache is particularly effective in handling high-traffic websites, making it a valuable tool for optimizing web server performance and ensuring a faster, more efficient user experience.
Here we are going to install and deploy the nginx webserver on port 8080 and the varnish cache on port 80 so any request coming to port 80 on the server will be cached by the varnish cache and forwarded to the nginx webserver which reduces the loading time.
In this article, I am using the Ubuntu server. You must need a Ubuntu server with root access.
SSH into the server
Step 1: Update the repo and install the varnish cache.
First of all, we need to update our apt repo using the apt-get update -y command.
apt-get install varnish -y
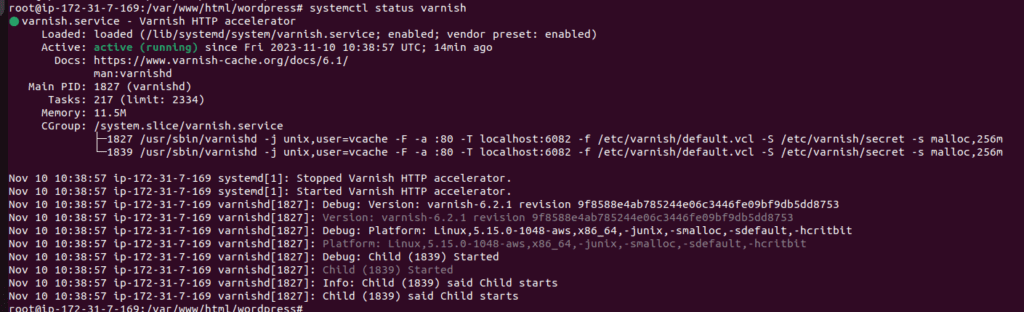
After the installation, you can check the status of the varnish cache using the command.
systemctl status varnish
You can also verify the installed version using the command.
varnishd -v
varnishd (varnish-6.2.1 revision 9f8588e4ab785244e06c3446fe09bf9db5dd8753)
Copyright (c) 2006 Verdens Gang AS
Copyright (c) 2006-2019 Varnish Software AS
Step 2: Installing the nginx webserver
By default, nginx will run on port 80 so we need to change the listening port to 8080.
apt install nginx -y
This will install the nginx webserver and on the /etc/nginx/sites-available/default conf we need to change the listening port to 8080 as shown below.
server {
        listen 8088 default_server;
        listen [::]:8088 default_server;
        root /var/www/html;
        index index.html index.htm index.nginx-debian.html;
        server_name _;
        location / {
                try_files $uri $uri/ =404;
        }

}
After that, we need to restart the nginx webserver.
systemctl restart nginx
Step 3: Changing the port of the varnish service
By default varnish will be listening on ports 6081 and 6082 you can check this by using the netstat command.
netstat -nltpu
You need to edit the systemd file on the location /lib/systemd/system/varnish.service
and change the default port from 6081 to 80 in the line ExecStart as shown below.
[Unit]
Description=Varnish HTTP accelerator
Documentation=https://www.varnish-cache.org/docs/6.1/ man:varnishd

[Service]
Type=simple
LimitNOFILE=131072
LimitMEMLOCK=82000
ExecStart=/usr/sbin/varnishd -j unix,user=vcache -F -a :80 -T localhost:6082 -f /etc/varnish/default.vcl -S /etc/varnish/secret -s malloc,256m
ExecReload=/usr/share/varnish/varnishreload
ProtectSystem=full
ProtectHome=true
PrivateTmp=true
PrivateDevices=true

[Install]
WantedBy=multi-user.target
Next, we need to reload the daemon using the command systemctl daemon-reload.
Then you need to configure nginx as a backend webserver for varnish you can do this by editing the conf file at the location /etc/varnish/defualt.vcl
backend default {
.host = "127.0.0.1";
.port = "8080";
}
Here we don’t need to make any changes as our nginx is already running on port 8080 if you are running nginx on another port make changes to this file
After that restart the varnish service using the command
systemctl restart varnish.service.
Step 4: Verify the varnish service.
Now any request coming to port 80 will be severed/cached by varnish and forwarded back to nginx test this using the curl command.
curl -I <your_server_public_ip>
curl -I http://<your_server_ip>/info.php

HTTP/1.1 200 OK
Server: nginx/1.18.0 (Ubuntu)
Date: Fri, 10 Nov 2023 10:56:17 GMT
Content-Type: text/html; charset=UTF-8
Vary: Accept-Encoding
X-Varnish: 32789
Age: 0
Via: 1.1 varnish (Varnish/6.2)
Accept-Ranges: bytes
Content-Length: 86554
Connection: keep-alive
You will be able to see a result as shown below which means nginx is serving with a varnish cache.
Summary:
This configuration is a simple one but you can use the same concept for serving varnish cache to your own websites via nginx and you can use SSL certificates also.
In this article, we have learned how to install and configure the varnish cache along with the nginx webserver