In our previous blog, we learned what is docker-swarm and how to create a cluster using docker-swarm Docker Swarm Made Easy
In this tutorial, we are going to learn what is docker service and how to create container replica sets using the docker service.
I am going to deploy an nginx-based container in the swarm cluster across 2 nodes.
We already learned how to run containers in a machine we normally create or pull the docker image and run the container using the docker-run command but in the case of docker-swarm, there might be 100 nodes in the cluster so it is impossible to run the commands and configure load-balancing etc across all the nodes in the cluster. This is where docker-swarm orchestration comes into the picture.
Docker-swarm automatically manages these things for us like restarting failed tasks, creating replicas accords nodes, setting up load-balancing etc.
The main component of docker-swarm is docker-service
Prerequisites:
You must have already installed docker on your machine and created a swarm cluster.
You can refer the below article to create a swarm cluster.
Docker Swarm Made Easy: A Step-by-Step Tutorial Series
What is a docker service?
A Docker service is a definition for a Docker container that is intended to be run in a distributed environment, such as a Docker Swarm cluster. It defines the number of replicas of the container that should be running, the network and storage resources that the container requires, and other configuration options.
When you create a Docker service, Docker Swarm schedules the containers to run on the nodes in the cluster based on the constraints and requirements that you specify. The service can be scaled up or down by changing the number of replicas, and Docker Swarm will automatically handle the deployment and removal of containers to match the desired state.
In addition to defining the container image and configuration, a Docker service also defines a network overlay that allows containers to communicate with each other across the nodes in the cluster. This network is isolated from the host network and can be configured to use different drivers and options to meet the needs of the service.
In this tutorial, I have created a swarm cluster with one master node and a worker node using https://labs.play-with-docker.com/.
Next, I am going to deploy the nginx container across 2 nodes.
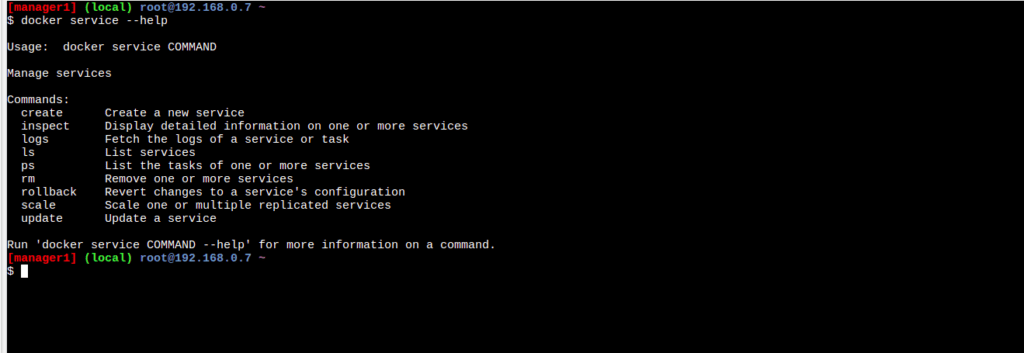
You can refer to the docker service help command to get more details about various commands
docker service –help
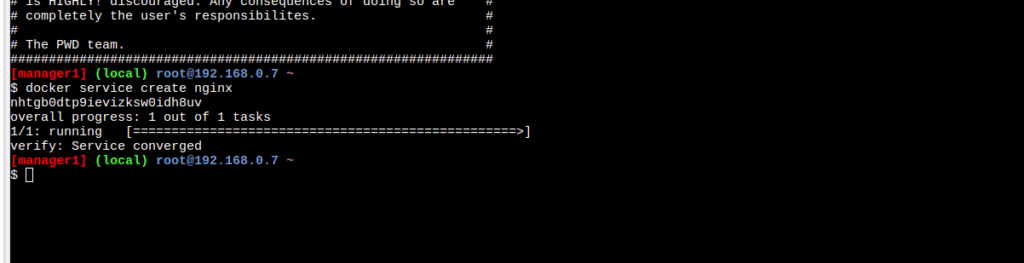
Creating nginx service
Firstly I am going o create a service for nginx using the docker service create command
docker service create nginx
This will create an nginx service for us and will provide the output similar to the below image
Next, we can list out services using ls command
docker service ls
The output shows that currently the nginx service is running with one replica and also docker has provided a name to that service by itself.
Also, you can view the task running using docker service ps <service_id>
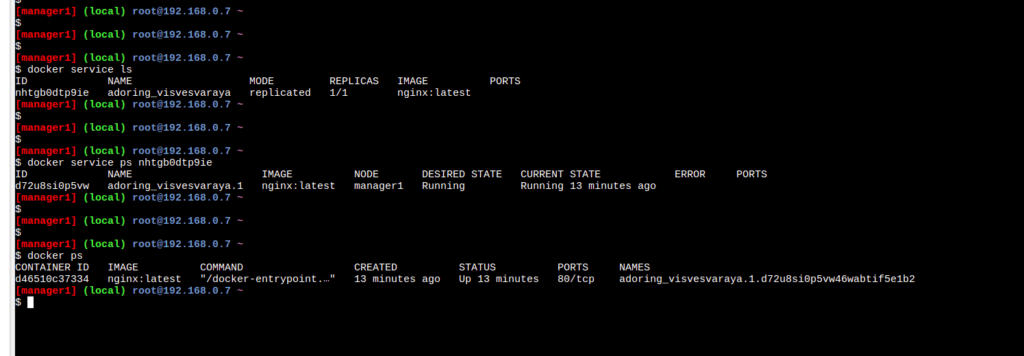
The output shows that currently one task of the service is running and it also displays other information like the node in which the task is running the image name etc.
Also, you can see the current status of the running container using the docker ps commands.
Publishing port to the service
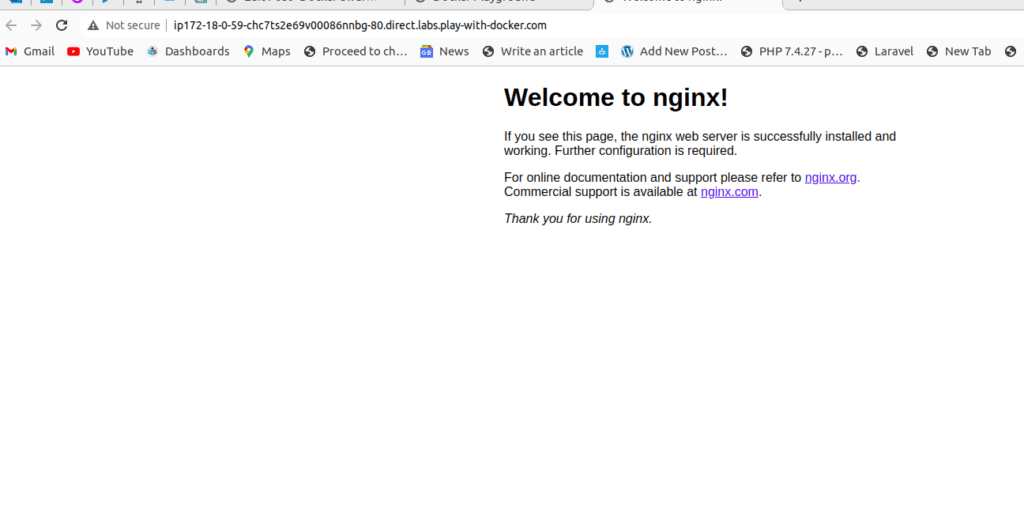
As shown above, the current task is running in the master node by default as the container is a web server by default it will run on port 80 but we didn’t expose the host port in order to access it publicly for that we need to push a port to the docker service using docker service update command use docker service update –help for more details.
docker service update <service_id> –publish-add 80:80

So now after running this update command, I can see that my ports are exposed and now the nginx container is publicly accessible via host port 80.
You can go to the open port option in play with docker and will be able to see the default nginx page as shown below
Scaling up the replicas
Next, I am doing to scale up my nginx service to 2 replicas from 1 replica for that I will use the docker service scale command
docker service scale <service_id or service_name>=2
You can use this command to scale up your service to the desired number you want
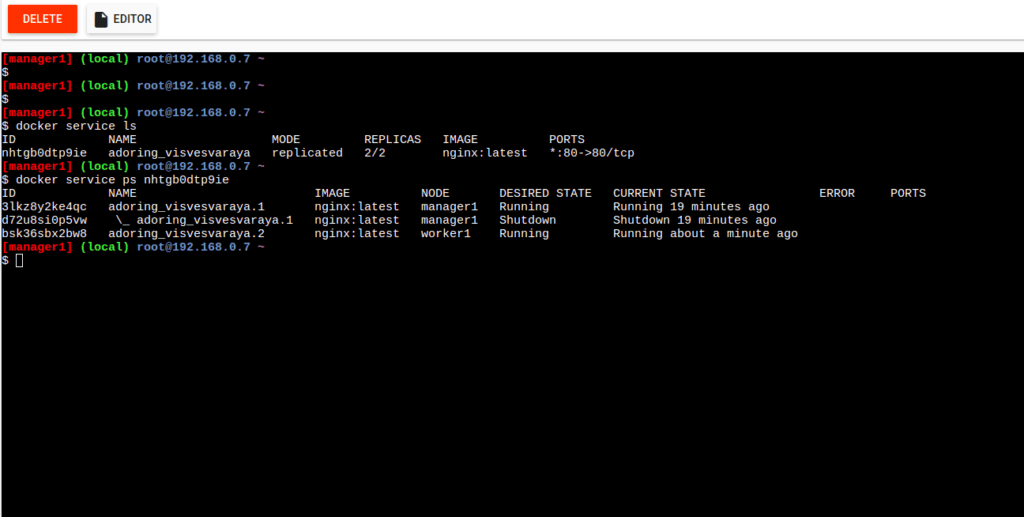
After scaling up the service I can see that my now nginx container is running in both the manager node and worker node as shown in the above image.

I also verified the running of the container by entering to my worker node and running the docker ps command
If you don’t want any container to be running on the manager node you can use the command.
docker node update –availability drain docker-master This will drain all the connections in the master node and shift to worker nodes here I am not doing it.
How does the docker service handle node failures?
We have learned that docker-service automatically handles node failures so what if the worker node goes down let us check how the service handles it.
I am going to leave the swarm cluster using the docker swarm leave command on the worker node and let us check what will happen.
If I check the status of the service from the manager node I can see that the docker service automatically shifted the task running from the worker node to the manager node as I can see both the running tasks are in the manager node as shown in the below image.
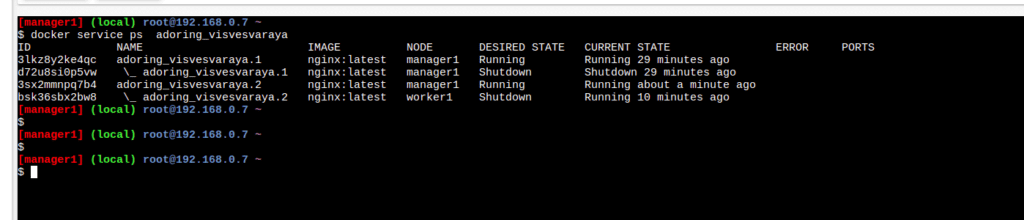
So docker service still keeps 2 replicas running even if the node fails this is the great advantage of using the docker service to host your container’s
But some of you have doubt’s now because both the containers are mapped to host port 80 and both are now running in the manager node. But how is it that possible? earlier we learned that we cannot use the same docker host port for multiple containers. This is where docker networking comes into the picture will convert it in the next lecture.
To stop a Docker service, you can use the docker service rm command followed by the service name. Here’s the command to stop a Docker service
docker service rm
Summary:
In this tutorial, we have learned the basic of the docker service and its working